
Introduction: Why Your Setup Matters
Most people think installing WordPress is the hard part. It’s not.
The real difference between a slow, struggling website and a fast, ranking one starts with how you set it up in the first 10 minutes. In this guide, I’ll show you how to install WordPress on Hostinger the right way—not just a basic setup, but a performance-first setup that’s ready for SEO from day one.
💡 I’ve been using Hostinger’s Business Shared Hosting since 2024 to run TechFin2k, and I’ve tested everything—from basic one-click installs to advanced performance optimizations.
👉 You can also check my detailed
Hostinger performance review here
to see real speed test results and benchmarks.
Start Your WordPress Website on Hostinger
Get fast, reliable hosting with built-in performance tools and an easy WordPress setup.
- ✔ Free SSL & domain (on select plans)
- ✔ LiteSpeed caching for speed
- ✔ Beginner-friendly hPanel
What’s Different in 2026?
Hostinger has made the setup process much easier with tools like Kodee (their AI assistant) and the newer onboarding flow.
While these tools can help you launch a website faster, they often apply generic settings and install plugins that you may not actually need.
⚠️ The truth: Even in 2026, a standard “one-click install” is not enough if you care about Core Web Vitals, speed, and Google rankings.
That’s why this guide goes beyond just clicking “Install”—you’ll learn how to set up your site so it performs well from day one.
What You’ll Learn in This Hostinger WordPress Setup Guide
Here’s exactly what we’ll cover:
- A clean 10-minute WordPress install (without unnecessary plugins)
- Server-level optimizations like LiteSpeed and object caching
- Essential 2026 SEO settings (SSL, PHP version, and structure)
- Common beginner mistakes that slow down your site over time
Who This Guide Is For
This guide is ideal if you:
- Are starting a blog or business website
- Want a fast and secure WordPress setup
- Prefer a simple, step-by-step process without technical confusion
Step 1: Accessing Hostinger hPanel (Getting Started)
Before you install WordPress, you need to access your hosting dashboard—this is where everything begins. Hostinger uses a custom control panel called hPanel, which is designed to be significantly faster and more beginner-friendly than traditional panels like cPanel.
How to Log in to hPanel
Go to: https://hpanel.hostinger.com and log in using your account credentials.
💡 Pro Tip: Use Social Login (Faster & More Secure) To skip manual password entry, Hostinger supports several secure social login options:
- Google (Recommended): The fastest and most integrated option.
- GitHub: Perfect for developers who want to keep their tech accounts connected.
- Facebook: A quick alternative if you are already active on social platforms.
Why use this? Beyond the speed of “one-click” access, it leverages the built-in security (like 2FA) from your provider, meaning you have one less sensitive password to manage and protect.
Navigating the hPanel Dashboard
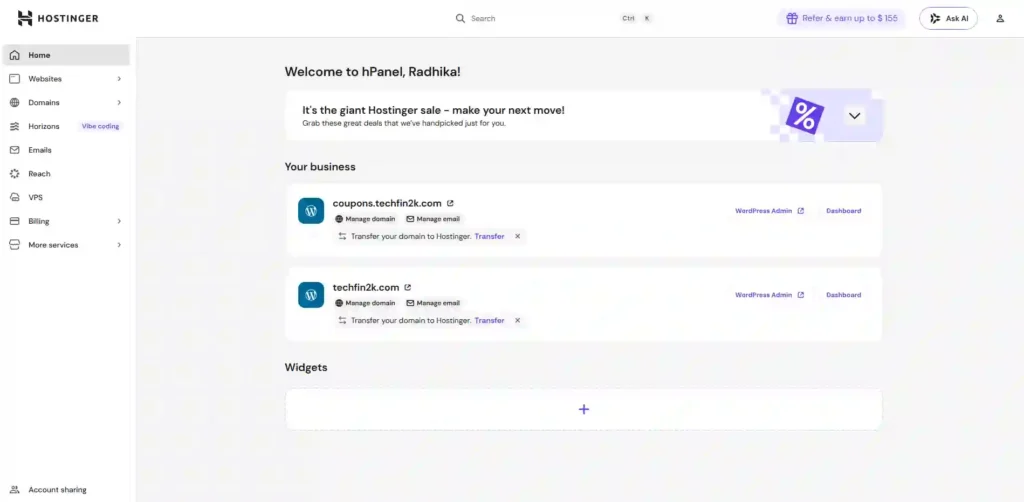
Once logged in, you’ll notice a clean and simple interface.
Here are the key sections you’ll use during setup:
- Websites: Your main control area for WordPress installation and management
- Emails: Used to create professional email accounts
- Search Bar (Top): Quickly find tools like “Auto Installer” or “SSL”
If you ever feel lost, the search bar is the fastest way to navigate.
hPanel vs cPanel (What’s Different?)
If you’ve used other hosting providers that use cPanel with Softaculous, you might notice a difference:
- You won’t immediately see a giant wall of apps like Joomla, Drupal, or OpenCart on the main screen.
- The Reason: Hostinger follows a WordPress-first approach. They prioritize the tools 90% of bloggers need for speed and SEO.
However, Hostinger still fully supports other CMS platforms. If you aren’t using WordPress for a specific project, you can find them under: Websites → Auto Installer (or “Site Installs”).
This includes:
- Joomla (for complex site structures)
- Drupal (for advanced development)
- OpenCart (for dedicated e-commerce)
For this guide, we’ll focus on WordPress since it offers the best balance of flexibility and performance for 2026 blogging standards.
Why hPanel Is Beginner-Friendly
If you’ve used traditional panels before, hPanel feels much more modern. It offers:
- Faster loading interface: No clunky icons or legacy code slowing down your backend.
- Clean navigation: Features are grouped logically under Websites, Security, and Performance.
This makes it easier to manage your site, even if you’re just starting out.
With the hPanel dashboard ready, the next step is to install WordPress and set up your website.
Step 2: Installing WordPress on Hostinger (Complete Setup Flow)
Let’s begin the WordPress installation on Hostinger using its optimized setup flow.
The process itself is simple, but the choices you make here can affect your site’s performance and flexibility in the long run.
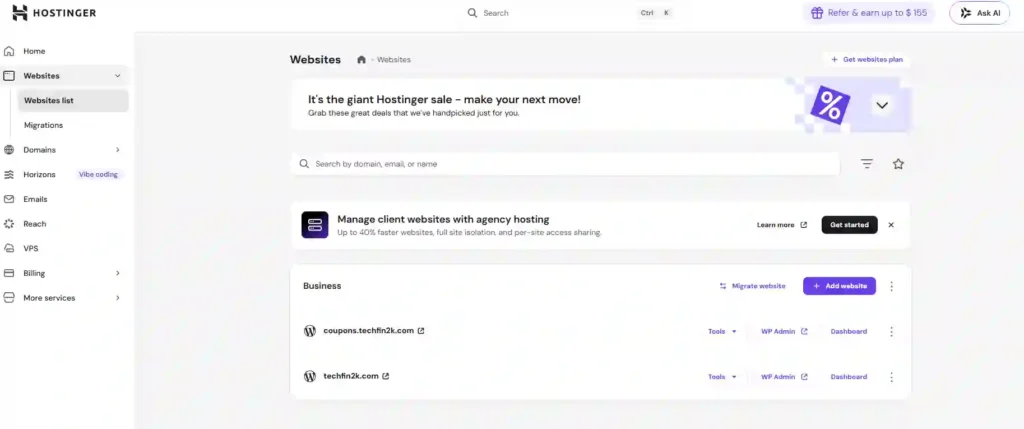
Access the Website Setup Section
From the left sidebar in hPanel:
Click Websites
On the right side, you’ll see your existing domains (if any), such as your main site or subdomains.
To create a new website:
Click Add Website
Choose Your Platform
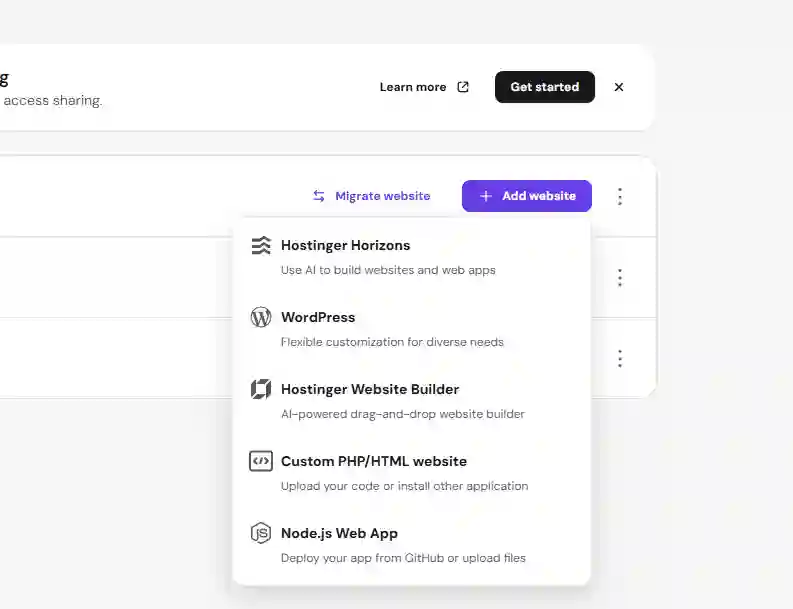
After clicking “Add Website,” you’ll see several setup options:
- Hostinger Horizons
- WordPress
- Hostinger AI Website Builder
- Custom PHP/HTML Website
- Node.js
Select: WordPress
Hostinger highlights its AI tools during setup, but if your goal is blogging, SEO, or affiliate marketing, WordPress is the better choice.
WordPress offers the most control and long-term flexibility.
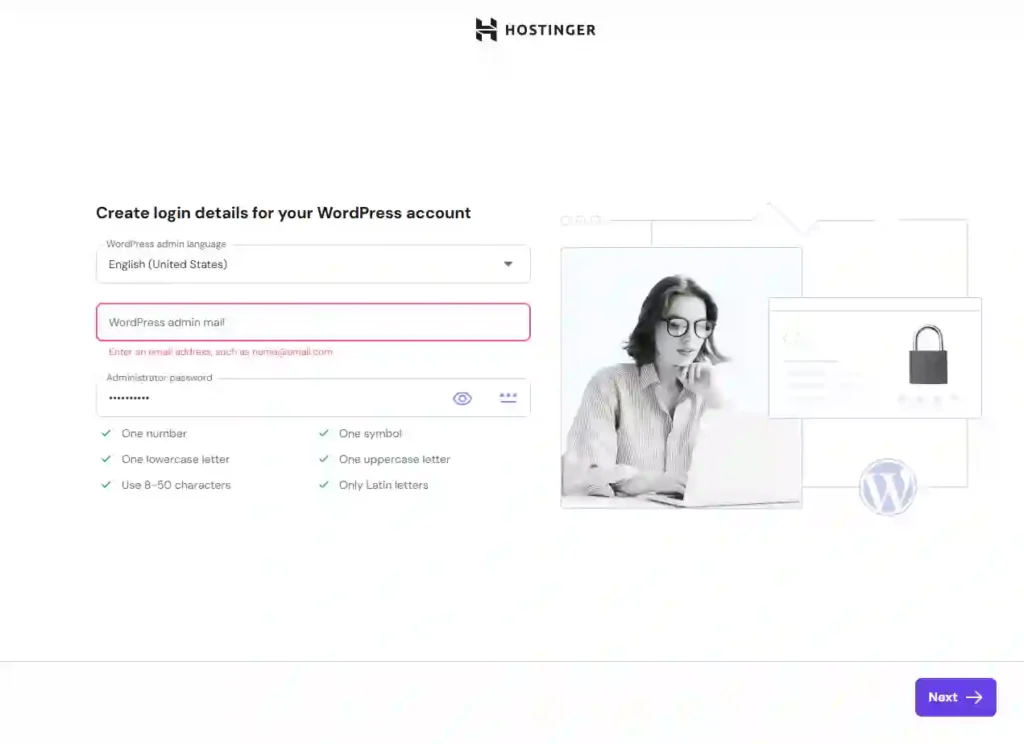
Enter WordPress Login Details
Next, you’ll see the WordPress installation form.
Fill in:
- Admin Language
- Admin Email
- Password
Important:
These credentials are for your WordPress dashboard, not your Hostinger account. Keep them secure.
Choose Your Domain or Subdomain
Now select where you want to install WordPress:
- Your main domain
- A subdomain
- Or a temporary domain (e.g.,
yourname.hostingerapp.com)
Real Experience: What I Noticed
For testing setups, using a subdomain is often the best option.
For example:
testhostinger.foenix.techfin2k.com
⚠️ Note:
Hostinger may block certain words to prevent security issues. For example, using the word “hostinger” in a complex subdomain like test.hostinger.foenix.techfin2k.com will trigger a validation error. To avoid this, keep your subdomain names simple and relevant.
Installation Process
Once you proceed:
⏱ WordPress installation usually takes around 1–2 minutes
During this time:
- Database is created
- Core WordPress files are installed
- Initial configuration is completed
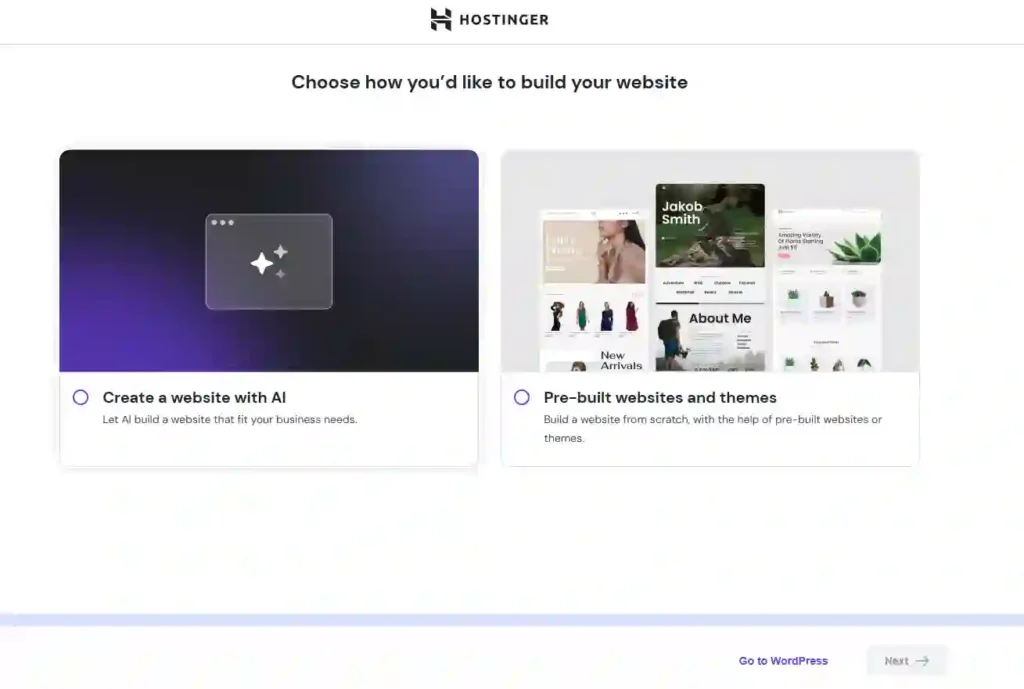
Post-Installation Options: AI vs Manual Setup
After installation, you’ll see:
“Choose how you’d like to build your website”
If performance and SEO are your priority, my recommendation is to skip both and go directly to the WordPress dashboard.
You’ll have two main options:
Option 1: Create a Website with AI (Kodee)
Hostinger’s AI assistant, Kodee, helps generate a website automatically.
It may ask for:
- Your website idea
- Language
- Preferred editor (Gutenberg or Elementor)
- Brand name
Based on your inputs, it creates:
- Basic layout
- Pages
- Initial design
Option 2: Pre-built Websites and Themes
This option allows you to:
- Choose from ready-made templates
- Customize layouts manually
- Start with a structured design
This is faster than starting from scratch, but may include additional design elements you might not need.
My Recommendation
Both options can be useful depending on your needs.
However, if you want full control over performance and SEO:
You can skip both and go directly to the WordPress dashboard
This allows you to:
- Choose a lightweight theme
- Install only essential plugins
- Keep your site clean from the start
Access Your WordPress Dashboard
You can access your dashboard at:
yourdomain.com/wp-admin
You can log in using your WordPress credentials, or access the dashboard directly from hPanel without entering them again.
With WordPress installed, the next step is to optimize your setup for speed and performance.
Step 3: Performance Optimization (Set It Right from Day One)
After you install WordPress on Hostinger, optimizing performance is the next critical step.
Most tutorials stop here, but the settings you apply now can directly influence your site speed, Core Web Vitals, and overall SEO performance.
Enable SSL and Force HTTPS
First, make sure your website is fully secured with HTTPS.
In most cases, Hostinger installs SSL automatically. However, if your domain is managed through services like Cloudflare, the SSL installation may not complete immediately.
Important: If you use Cloudflare, ensure your SSL mode is set to “Full” or “Full (Strict)” to avoid “Too Many Redirects” errors.
What about Hostinger’s Built-in CDN? If you are on the Business plan or above, Hostinger also provides its own native CDN. You can find this under
hPanel → Performance → CDN
- If you already use Cloudflare: You do not need to enable Hostinger’s CDN (using two CDNs at once can cause conflicts).
- If you don’t want to use Cloudflare: Definitely enable Hostinger’s native CDN for a significant speed boost.
For those who prefer the advanced features of Cloudflare, you can follow my guide on How to Setup Cloudflare Free CDN: Step-by-Step.
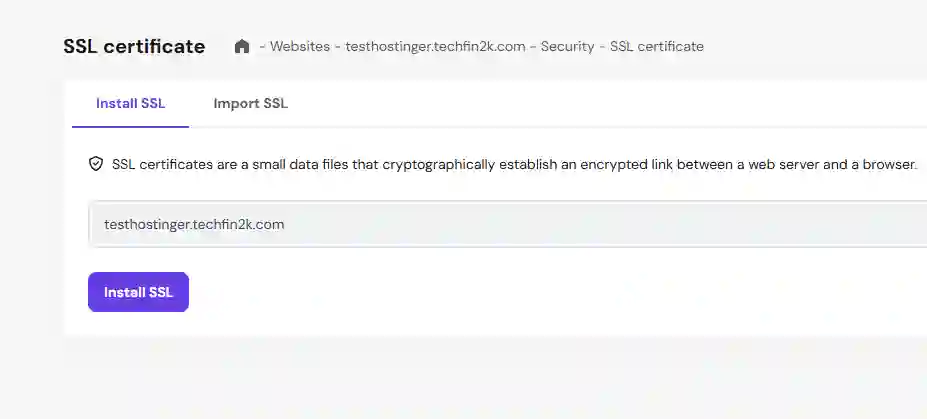
Verify SSL Status
Go to:
hPanel → Security → SSL
Check:
✔ Status = Active
If SSL is already active, your site is secured.
Real Experience Note (Important)
In my case, my domain was connected through Cloudflare, and SSL did not activate automatically.
To fix this:
- I updated the A record in Cloudflare to point to Hostinger’s server IP
- After propagation, SSL was installed successfully
Once SSL is active, Hostinger may automatically enable HTTPS redirection.
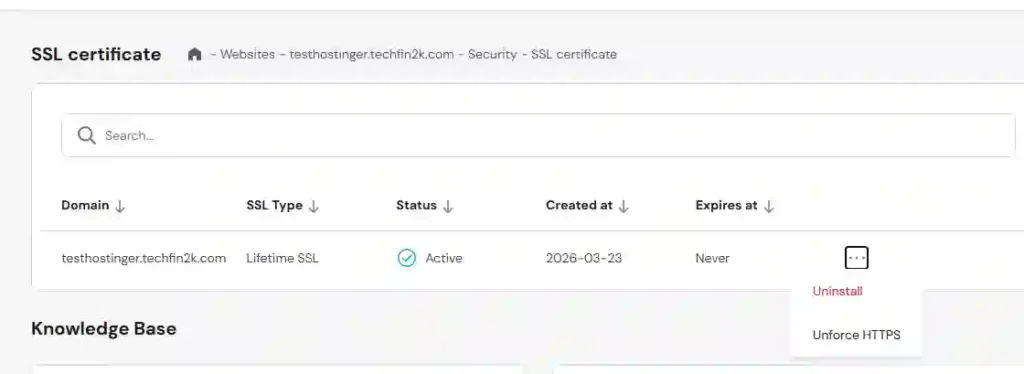
Force HTTPS (If Not Enabled)
If HTTPS is not enforced:
Click the three dots (⋮) next to your domain
Enable Force HTTPS
⚠️ Important Observation
If you see “Unforce HTTPS” instead of “Force HTTPS”:
That means HTTPS is already enabled
No further action is required
Benefits of Enabling Force HTTPS
- Prevents users from accessing the insecure HTTP version
- Avoids duplicate URL issues
- Required for modern SEO and browser trust
Enable Server Cache (Cache Manager)
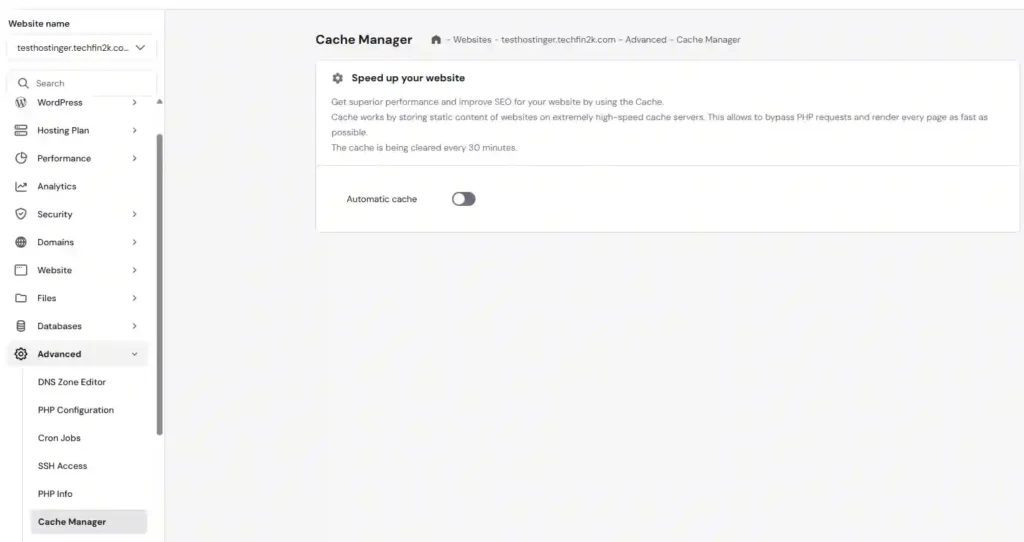
Hostinger provides built-in server-level caching through the Cache Manager.
Go to:
Websites → Advanced → Cache Manager
Make sure:
✔ Automatic cache is enabled
Real Observation
In some cases (like mine), this setting may be turned OFF by default.
If it’s OFF:
- Enable it manually
- This ensures basic caching is active
What This Does
- Stores static versions of your pages
- Reduces server processing
- Improves loading speed
Enable LiteSpeed and Object Cache (Advanced Optimization)
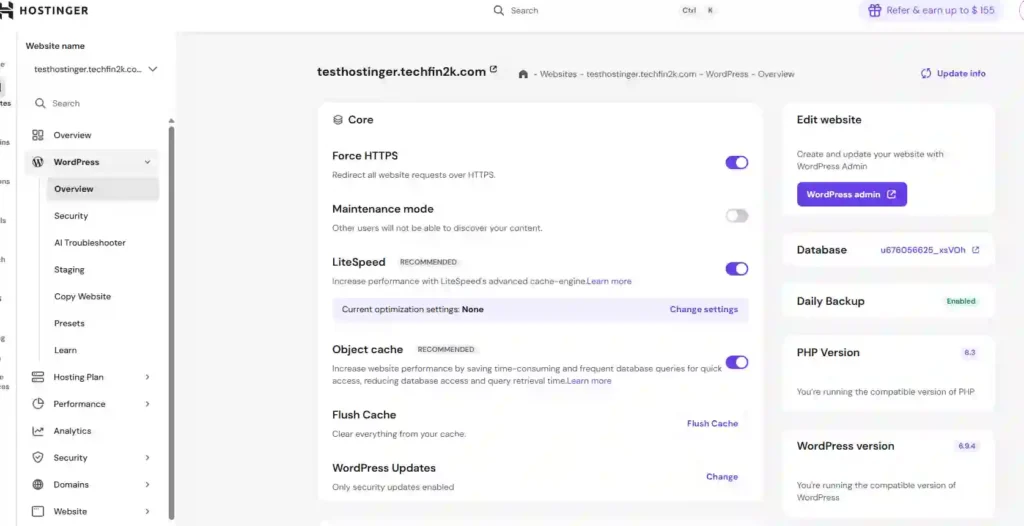
In addition to server cache, Hostinger provides advanced performance features through LiteSpeed.
Go to:
Websites → WordPress → Overview
Make sure:
✔ LiteSpeed = ON
✔ Object Cache = ON
Why Caching Improves Website Performance
- Enables advanced caching engine
- Speeds up dynamic content
- Stores database queries in memory
- Improves dashboard responsiveness
Pro Performance Tip
Even if LiteSpeed and Object Cache are enabled:
If Cache Manager is OFF, you are not using full server-level caching.
Best performance comes from using both layers together.
For best performance, ensure both server cache and LiteSpeed optimization are enabled.
Update PHP Version
Using the latest PHP version improves both speed and security.
Go to:
hPanel → Advanced → PHP Configuration
Select:
✔ Latest stable version (e.g., PHP 8.3 or higher)
Why PHP Version Matters
- Faster request processing
- Better compatibility with modern plugins
- Improved security
Verify Daily Backups
Hostinger Business plans include automatic daily backups.
Go to:
hPanel → Files → Backups
Check:
✔ Daily backups are enabled
💡 Pro Tip
Before making major changes (like installing a theme or redesigning your site), create a manual backup.
Quick WordPress-Level Optimization
Now open your WordPress dashboard:
yourdomain.com/wp-admin
Permalinks (SEO Critical)
Go to:
Settings → Permalinks
Select:
✔ Post Name
Basic Cleanup
- Delete the “Hello World” post
- Remove the “Sample Page”
- Keep only one default theme as backup
Search Engine Visibility
Go to:
Settings → Reading
Make sure:
✔ “Discourage search engines” is unchecked
Expert Insight
A clean and optimized setup at the beginning is much easier than fixing performance issues later.
👉 If you haven’t set up hosting yet, you can start with Hostinger here and follow the same steps in this guide: Start Your Website on Hostinger
Step 4: Post-Install Cleanup & Long-Term Maintenance
Once you install WordPress on Hostinger and complete the optimization steps, the final step is to clean up your setup and avoid common mistakes that can slow down your site over time.
This step is simple, but it plays a critical role in long-term performance and SEO.
Remove Default Content (Quick Cleanup)
If you used Kodee or a pre-built template during setup, your site may have AI-generated pages, demo posts, or placeholder content that needs to be reviewed and cleaned up before you start publishing.
If you haven’t already cleaned up default content during setup, remove any unused posts or pages.
Why Cleanup Matters
- Keeps your site clean from the beginning
- Avoids indexing unnecessary pages
- Improves overall content quality
Remove Unused Themes and Plugins
WordPress often includes extra themes and plugins that are not required.
Keep only what you actually use.
Even inactive plugins and themes can add unnecessary load and increase security risks.
Avoid Overloading Your Site with Plugins
One of the most common mistakes beginners make is installing too many plugins early on.
This leads to:
- Slower performance
- Plugin conflicts
- Maintenance issues
✔ Start with essential plugins (like Rank Math or LiteSpeed Cache)
Choose a Lightweight Theme
Your theme plays a major role in performance.
Avoid heavy, multipurpose themes with too many built-in features.
✔ Use lightweight themes that are optimized for speed (such as Astra or GeneratePress)
Monitor Performance Regularly
Even with a good setup, performance can change over time.
Make it a habit to:
- Test your site speed
- Review installed plugins
- Keep everything updated
Don’t Skip Backups Before Changes
Before making major updates:
- Installing plugins
- Changing themes
- Editing design
Always create a backup.
Final Insight
A clean and controlled setup is much easier to manage than fixing issues later.
Common Beginner Mistakes When Setting Up WordPress on Hostinger
Even after a perfect technical install, the decisions you make in the first week can limit your site’s growth. Based on my experience running TechFin2k, here are the most important pitfalls to avoid:
Focusing on Design Over Performance
Many beginners choose themes based on visual appeal rather than speed.
The Reality:
Google prioritizes Core Web Vitals. A visually impressive site that loads slowly will struggle to rank.
Choose a lightweight theme (like Astra or Kadence) and enhance design gradually.
Changing URLs After Publishing (The Slug Trap)
One common mistake is modifying URLs after a page has already been published.
The Impact:
Once Google indexes a page, changing its slug can create 404 errors and negatively affect rankings.
Always finalize your URL structure before publishing content.
Over-Reliance on AI Builders
Hostinger’s AI tools (like Kodee) are useful for getting started.
The Mistake:
Treating AI-generated layouts or content as final.
Use AI to build the foundation, but manually refine structure, headings, and content to match search intent.
Uploading Unoptimized Images
Large images are one of the most common causes of slow websites.
The Problem:
Uploading high-resolution images directly increases page size and load time.
Resize images (around 1200px width) and convert them to WebP format before uploading.
Neglecting Internal Linking
Beginners often publish content without connecting it to existing posts.
The Impact:
This reduces crawlability and weakens your site’s SEO structure.
Link every new post to 2–3 relevant articles to build topical authority.
Final Insight
Installing WordPress takes minutes, but building a fast and scalable website requires consistent optimization and smart decisions over time.
Which Hostinger Plan Should You Choose?
If you haven’t chosen a hosting plan yet, here’s a quick comparison to help you pick the right one:
| Plan | Single | Premium ⭐ | Business |
|---|---|---|---|
| Websites | 1 | 100 | 100 |
| Free Domain | ❌ | ✔ | ✔ |
| Performance | Standard | Better | Best |
| Backups | Weekly | Weekly | Daily |
| Best For | Basic site | Bloggers ⭐ | Growing sites |
| Action | Not Recommended | Premium Plan | For Advanced Users |
💡 Recommendation: For most beginners, the Premium plan offers the best balance of price, features, and performance.
🚀 Ready to Launch Your Website?
You’ve learned how to install WordPress on Hostinger. Now take the next step and launch your website with a fast and optimized setup.
🔥 Launch Your Website Now✔ Fast setup • ✔ SEO optimized • ✔ Beginner friendly
Conclusion: Your WordPress Site Is Now Ready
By now, you’ve completed everything needed to install WordPress on Hostinger and optimize it for performance, security, and SEO.
From choosing the right setup options to enabling caching, SSL, and cleanup steps—you’ve built a strong foundation for a fast and scalable website.
But remember:
Installing WordPress is just the beginning.
Long-term success comes from consistent content, optimization, and smart decisions.
As your next step, focus on:
- Publishing high-quality content
- Building internal links
- Monitoring performance regularly
If done right, your site won’t just load fast—it will grow consistently in search rankings.
Frequently Asked Questions
How long does it take to install WordPress on Hostinger?
WordPress installation on Hostinger typically takes less than 2–3 minutes using the built-in setup process. Additional optimization steps may take 10–15 minutes.
Is Hostinger good for WordPress beginners?
Yes, Hostinger is beginner-friendly due to its simple hPanel interface, one-click WordPress installation, and built-in performance features like LiteSpeed and caching.
Do I need LiteSpeed Cache on Hostinger?
Yes, using LiteSpeed Cache (or server-level caching) is highly recommended. It improves page speed, reduces server load, and helps with Core Web Vitals.
Can I install WordPress on a subdomain in Hostinger?
Yes, you can install WordPress on a subdomain (e.g., blog.yoursite.com) directly from hPanel. This is useful for testing or creating separate sections of your site.
Why is my Hostinger site slow after installation?
A slow site is usually caused by unoptimized themes, large images, too many plugins, or disabled caching. Proper optimization fixes most speed issues.
Should I use Hostinger AI website builder or WordPress?
If your goal is blogging, SEO, or affiliate marketing, WordPress is the better choice. The AI builder is useful for quick setups but offers limited control.

One Comment