
Last Updated on July 19, 2026 by RADHIKA VATLAM
- Introduction
- Hostinger Features Overview (What You Actually Get)
- Professional Email Hosting in Hostinger
- Content Delivery Network (CDN) in Hostinger
- Hostinger Backups (Your Safety Net)
- Resource Usage in Hostinger (Understanding Your Site Performance)
- WordPress Staging in Hostinger (Test Changes Safely)
- SSL & Security in Hostinger (Protecting Your Website)
- AI Assistant (Kodee) in Hostinger (Quick Help Inside hPanel)
- Git & SSH Access in Hostinger (For Advanced Users)
- Pros and cons of hostinger features
- Final Thoughts: Is Hostinger Worth It?
- FAQs
Introduction
When most people buy hosting, they focus on just one thing—getting their website live.
But with Hostinger, you’re actually getting much more than just server space. From professional email to built-in backups, staging environments, and CDN integration, Hostinger offers a complete ecosystem designed to help your website grow.
The problem? Most beginners barely use 30% of these features.
In this guide, I’ll break down the most important Hostinger features and show you how they work in real-world scenarios, based on my hands-on experience running my website, Techfin2k.com
If you haven’t set up and optimized your website yet, follow this complete step-by-step guide:
How to Install and Optimize WordPress on Hostinger (Complete Guide)
- Best for beginners: Hostinger is easy to use thanks to hPanel and built-in website tools.
- Most useful features: Free SSL, backups, and professional email hosting.
- Best for performance: CDN support and resource monitoring help improve speed and stability.
- Best for safe changes: Staging and backups reduce the risk of breaking your live site.
👉 Check the latest plans and features here: View Hostinger plans
Hostinger Features Overview (What You Actually Get)
Before we dive into each feature in detail, here’s a quick overview of the most important Hostinger features.
This will help you understand what’s included and how each feature plays a role in managing, securing, and growing your website.
Note: Some features may vary depending on the hosting plan. Advanced tools are typically available on higher-tier plans.
Now let’s break down each of these features and see how you can actually use them in real-world scenarios.
Professional Email Hosting in Hostinger
One feature I personally found very useful in Hostinger is its professional email hosting.
With many hosting providers, email hosting is either:
- a separate paid service, or
- bundled only with higher-tier plans
But with Hostinger, you can create domain-based emails like:
- contact@foenix.techfin2k.com
- info@foenix.techfin2k.com
Important Note (Based on Current Plans)
When I first purchased my hosting, email was included for the full hosting period.
However, based on current pricing and plans, Hostinger now provides free email hosting only for the first year on most plans. After that, it may require renewal or an additional cost.
So it’s important to check the latest plan details before purchasing.
You can check the latest pricing, included features, and current offers here: [View Hostinger plans]
Why This Feature Matters (Real Use Case)
Using a custom domain email instead of Gmail makes a noticeable difference.
For example:
- techfin2k@gmail.com → looks personal
- contact@foenix.techfin2k.com→ looks professional
When I started using a domain email for my site, it immediately improved:
- trust when reaching out for affiliate partnerships
- communication credibility
- brand consistency
How to Create an Email in Hostinger (Quick Overview)
Creating an email account in Hostinger is simple and takes less than 2 minutes.
- Go to hPanel → Emails
- Click Create Email Account (or Claim free email in newer versions)
- Select your domain
- Enter desired email id and password
- Click Create
Note: The email setup process in hPanel may vary slightly depending on updates. In newer versions, you may first see an option to “Claim free email”, then select your domain and activate the email service before creating mailboxes.
How It Actually Works (Not Just Theory)
Once your email is created, you can manage everything from the email dashboard inside hPanel. Here’s how it looks inside hPanel:
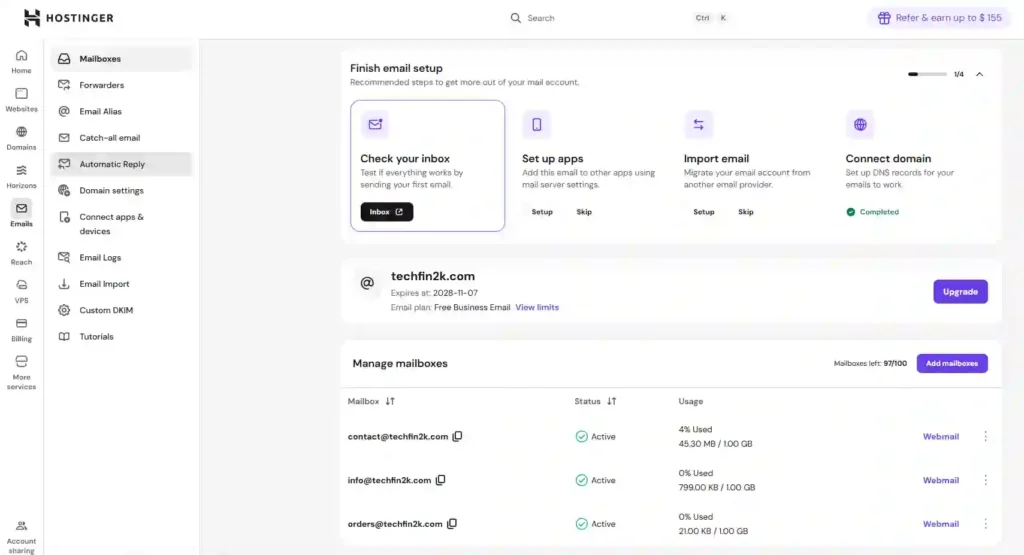
As you can see in the dashboard:
- You can create multiple email accounts
- Monitor storage usage
- Access webmail directly
- Manage settings like forwarders and auto-replies
Now your email is set up and visible in the dashboard, let’s look at how you can access and use it.
1. Webmail (Direct Access)
Hostinger provides a built-in webmail interface, which you can access using your email and password.
This works just like a browser-based inbox:
- Inbox
- Sent
- Drafts
Useful if you don’t want to configure anything.
2. Use It with Gmail (Recommended)
This is what I personally use.
You can connect your domain email to Gmail using IMAP/SMTP, so:
👉 You get the Gmail interface, but send emails from your domain
Example:
- Compose in Gmail
- Sent as: contact@foenix.techfin2k.com
This setup is much more convenient because:
- familiar interface
- easier email management
- mobile-friendly
Once your email is set up and connected, one important thing to consider is deliverability—making sure your emails actually reach the inbox instead of spam.
Important: Email Deliverability (SPF & DKIM)
If you skip this step, your emails may end up in spam.
Hostinger allows you to configure:
✔ SPF Record (Example)
v=spf1 include:_spf.mail.hostinger.com ~all
✔ DKIM
Enabled directly from hPanel (adds authentication automatically)
👉 These help:
- improve inbox delivery
- build trust with email providers
Practical Tips (From Experience)
Use simple names:
- info@
- contact@
- admin@
Avoid:
- random numbers
- long or confusing names
Save your login credentials—you’ll need them for Gmail setup
If your hosting provider doesn’t include email, you can still create a professional domain-based email using alternative methods.
Additional Email Features (Optional)
While you’ve already seen options like forwarders and auto-replies in the dashboard, these features become more useful as your website or communication needs grow.
For example:
- Email Forwarders → Useful if you want all domain emails to land in your Gmail inbox without logging into webmail
- Auto Reply (Vacation Mode) → Helpful when you’re unavailable or want to acknowledge messages automatically
- Email Aliases → Lets you create variations like
support@orsales@without managing separate inboxes
These aren’t required for basic setup, but they can save time and make your email management more efficient as your site grows.
After the first year, email hosting renews at an additional cost. Occasionally, promotional pricing can be as low as $0.39/month on long-term plans, but regular pricing varies depending on the plan and offers.
It’s best to check the latest pricing before purchasing.
👉 Follow this step-by-step guide to create a professional email for free without hosting limitations
Content Delivery Network (CDN) in Hostinger
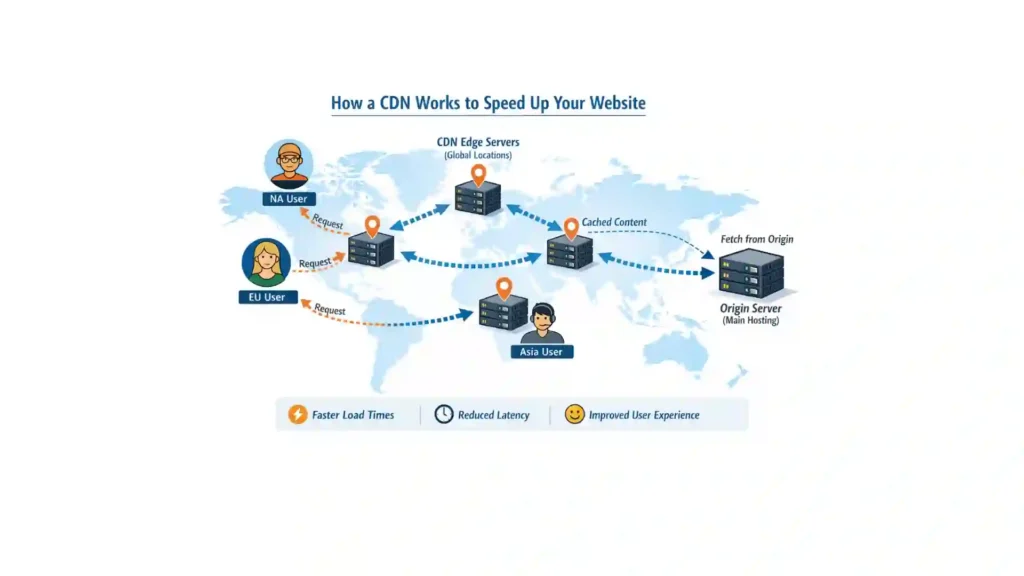
If your website serves visitors from different locations, a Content Delivery Network (CDN) is one of the most effective ways to improve performance.
At the same time, it’s also one of the most misunderstood features in web hosting.
What a CDN Actually Does (Simple Explanation)
Think of a CDN as a global delivery system.
Instead of every visitor loading your website from a single server, a CDN stores copies of your static content (like images, CSS, and JavaScript) across multiple servers worldwide.
When someone visits your site, the content is delivered from the nearest server location.
This results in:
- Faster loading times
- Reduced latency
- Smoother browsing experience
Real Insight (From Experience)
When I first enabled a CDN, I expected an instant speed boost.
But in reality, I learned a few important things:
- A CDN won’t fix an unoptimized website — it only improves delivery
- If your traffic is mostly local, the impact is minimal
- The real benefit comes when you have international visitors
This is something many tutorials don’t clearly explain.
Hostinger CDN vs Cloudflare
Hostinger provides a built-in CDN inside hPanel, which is very easy to enable.
However, many users (including me) prefer external CDN services like Cloudflare.
Why I Personally Use Cloudflare
From my experience, Cloudflare offers:
- A generous free plan
- Built-in security features (firewall, bot protection)
- Better control over caching
- Additional performance optimizations
That’s why I personally use Cloudflare instead of the built-in CDN.
Beginner Tip: Which CDN Should You Use?
If you’re just starting out, Hostinger’s built-in CDN is the safer and simpler option.
Cloudflare is more powerful, but it involves DNS-level configuration.
👉 A small mistake (like incorrect DNS or SSL settings) can lead to:
- site not loading properly
- SSL warnings
- caching issues
If you want a quick and risk-free setup, start with Hostinger CDN.
You can switch to Cloudflare later as you become more comfortable.
Do You Really Need a CDN?
✅ Use a CDN if:
- Your traffic comes from multiple countries
- Your site includes images or media-heavy content
- You want better global performance
❌ You can skip it if:
- Your audience is mostly local
- Your site is simple and lightweight
Important: CDN Is Not a Replacement for Optimization
Before enabling CDN, make sure:
- Images are optimized
- Caching is enabled
- Unnecessary plugins are removed
CDN improves delivery speed, not server performance.
How to Get Started
If you want to use Cloudflare, I’ve already created a detailed guide:
Follow this step-by-step guide to set up Cloudflare CDN on your website
Prefer a simpler approach?
You can enable Hostinger’s built-in CDN directly from hPanel under the Performance section.
If you want a hassle-free setup, Hostinger’s built-in CDN is included with their hosting plans, making it easier for beginners to get started.
Hostinger Backups (Your Safety Net)
One feature I genuinely rely on in Hostinger is its automatic backup system.
It’s something you don’t think about—until something breaks.
From my experience testing different hosting platforms, Hostinger’s backup system is one of the most user-friendly and practical to use.
What Hostinger Backups Actually Do
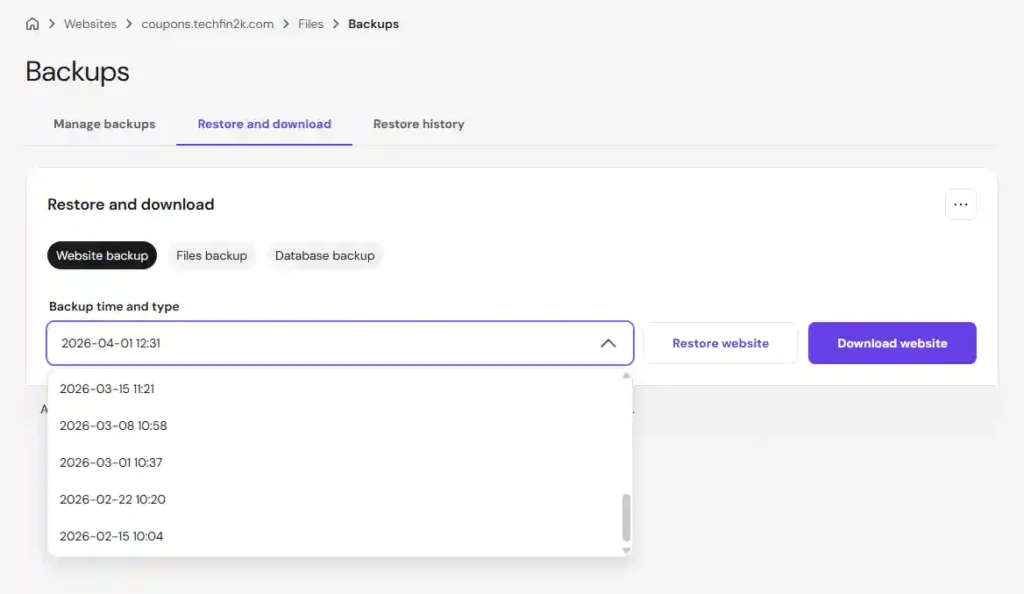
Hostinger automatically creates snapshots of your website, allowing you to restore your site to a previous working version if something goes wrong.
This is especially useful if:
- a plugin update breaks your layout
- a configuration change causes errors
- content gets accidentally deleted
Independent Backups for Each Website
Backups are managed per website inside hPanel.
This means:
- Your main domain and subdomains have separate backup sets
- You can restore only the affected site without impacting others
Backup Retention (Real Insight)
One thing I noticed with Hostinger is the extended backup history.
While many hosting providers keep backups for only 7–14 days, Hostinger can store backups for a longer duration.
In my case, I have access to up to 45 days of previous backups (Business shared hosting plan), which gives enough time to identify and fix issues even if they are noticed late.
Automatic vs Manual Backups
1. Automatic Backups (Default)
Hostinger automatically creates backups without any setup required.
These typically include:
- Website Backup → Full snapshot of your site
- Files Backup → Themes, plugins, images
- Database Backup → Posts, comments, settings
2. Manual Backups (Recommended)
You can also create backups manually whenever needed.
I personally recommend doing this before:
- Updating plugins or themes
- Making major design changes
- Editing important configurations
Taking a manual backup before changes can save a lot of recovery time if something goes wrong.
Flexible Restore Options
One of the most useful features is that you don’t always need to restore the entire website.
You can restore:
- Only files
- Only database
- Or the full website
This makes troubleshooting faster and avoids unnecessary data loss.
Best Practice (Important)
Even though Hostinger provides reliable backups, it’s always safer to maintain an additional copy.
- Download backups occasionally
- Store them locally or on cloud storage
This ensures your data remains safe even if something unexpected happens.
Resource Usage in Hostinger (Understanding Your Site Performance)
Once your website is live, one of the most important things to monitor is how efficiently it uses your hosting resources.
Hostinger’s Resource Usage dashboard gives you a clear view of what’s happening behind the scenes and helps you understand your site’s overall health.
What You’re Actually Monitoring
Inside hPanel → Resource Usage, you’ll find key metrics that indicate how your site is performing:
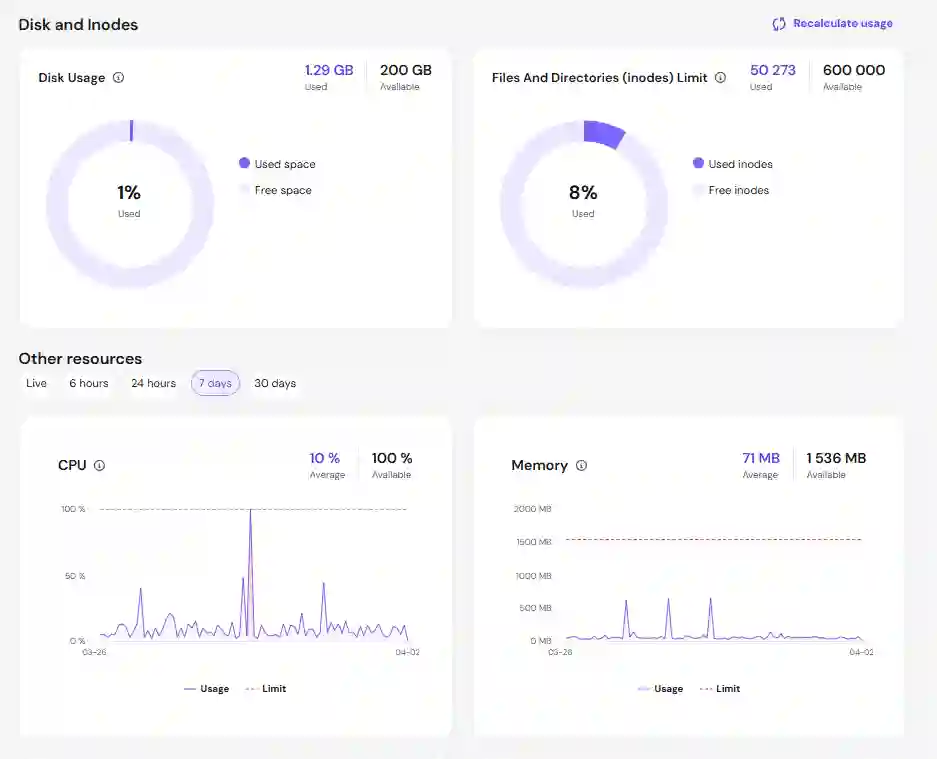
- CPU Usage → Processing power used to handle requests
- Memory (RAM) → Active memory consumed by your website
- Disk Usage & Inodes → Storage usage and number of files
- Throughput (I/O) → Data read/write speed
- PHP Workers → Number of concurrent requests your site can handle
These metrics help you identify whether your site is running smoothly or approaching its limits.
Real Insight (From My Usage)
From my own setup, I’ve been monitoring these metrics regularly.
Typically, I see:
- CPU usage around 15–20%
- Memory usage well within limits (under 150 MB of 1.5 GB available)
- Disk usage relatively low compared to the available storage
These numbers indicate that the site is running efficiently without putting heavy load on the server.
When to Take Action
If you notice consistent spikes in:
- CPU
- Memory
- PHP workers
It usually indicates:
- Too many or heavy plugins
- Unoptimized images
- Sudden traffic spikes
“Boost Resources” Feature (Real Observation)
Hostinger also provides an option to “Boost resources (Free for 24h)”, which temporarily increases your available resources.
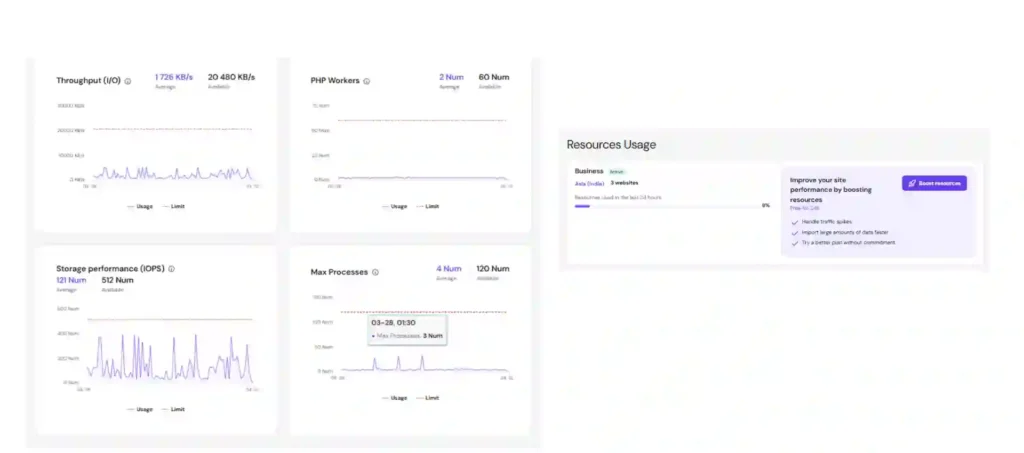
From my experience:
- I haven’t needed to use it for my site
- It can be helpful during traffic spikes or large operations (like migrations)
- It’s not something required for normal usage
Think of this as a temporary safety feature, not a long-term solution.
Practical Optimization Strategy
Before considering an upgrade, try:
✔ Optimizing images
✔ Removing unused plugins
✔ Enabling caching (LiteSpeed Cache works well with Hostinger)
In most cases, proper optimization solves resource issues.
Why This Dashboard Matters
Many beginners ignore resource usage until their site slows down.
By checking this dashboard occasionally, you can:
- prevent performance issues early
- understand how your site is growing
- decide when you actually need to upgrade your plan
WordPress Staging in Hostinger (Test Changes Safely)
One feature that many beginners overlook—but becomes very useful as your site grows—is the staging environment.
If you’ve ever worried that updating a plugin or changing your design might break your live site, staging gives you a safe way to test everything before going live.
What is a Staging Environment?
A staging environment is:
A duplicate version of your website, hosted on a separate subdomain
This allows you to:
- test changes
- fix issues
- experiment safely
without affecting your live website or visitors
How to Create a Staging Environment (Actual Workflow)
To create staging in Hostinger:
- Go to hPanel → Websites → Dashboard → WordPress → Staging
- Click “Create staging”
Enter Subdomain Name
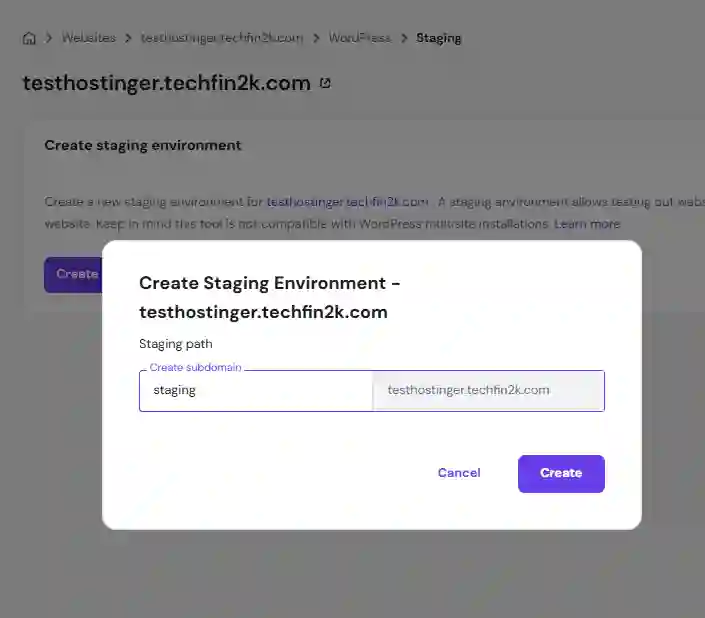
When you click create, Hostinger will ask you to enter a subdomain name.
For example:
- staging.yourdomain.com
- test.yourdomain.com
Unlike some platforms, this is not auto-generated—you can choose your own name.
Once you proceed:
- The subdomain is created
- Your entire website is duplicated into staging
“All information on your WordPress website will be duplicated to the staging files.”
⏱️ Setup Time (From My Experience)
Hostinger mentions it may take up to 15 minutes.
In my case, it was ready in just a couple of minutes (This depends on your site size)
How Publishing Works (Important to Understand)
This is where many beginners get confused.
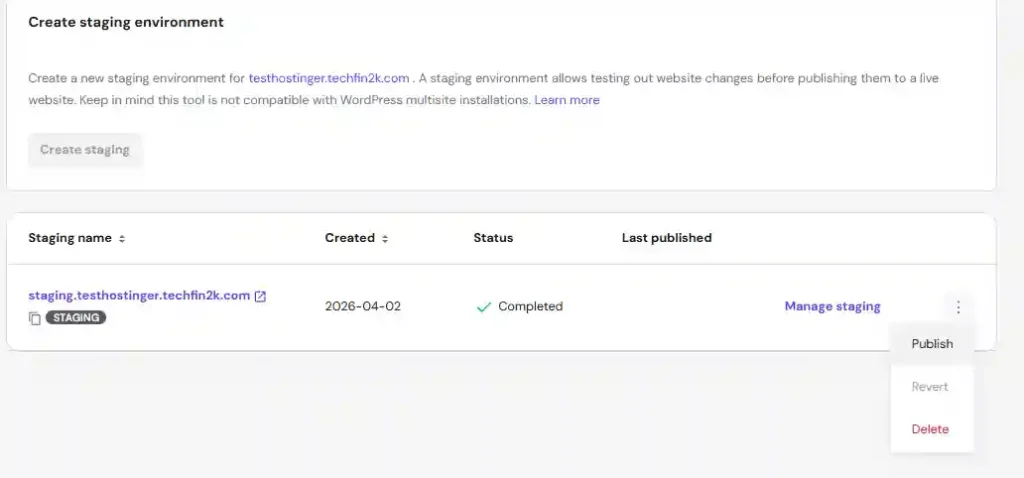
When you click Publish:
The staging version is copied to your live website
- Your live site gets updated with all changes
- Nothing happens automatically—you control when to publish
Think of it like publishing a draft—you test first, then apply changes when ready.
Can You Revert Changes?
Yes.
Hostinger allows you to revert if something goes wrong.
This means:
- Your previous version can be restored
- You’re not stuck with a broken site
Can You Delete Staging After Publishing?
Yes, completely safe
Once you publish:
- Your live site already has the updated version
- The staging site is no longer required
Deleting staging:
- does NOT affect your live site
- only removes the test environment
When You Should Use Staging
Staging is useful when:
- Updating plugins or themes
- Testing design changes
- Fixing issues
- Trying new features
It helps you avoid breaking your live website
⚠️ Important Notes
- Staging is created per website (including subdomains)
- Each site has its own staging environment
- Not compatible with WordPress multisite
Note for Cloudflare Users
If you are using Cloudflare (like I do), you may need to configure DNS properly for staging to work.
Since staging uses a subdomain (like staging.yourdomain.com), make sure:
- A DNS record (A record or CNAME) exists for that subdomain
- It points correctly to your hosting server
Otherwise:
- the staging site may not load
This is a small step, but important if you are using Cloudflare CDN.
Important Note on Availability:
Unlike basic features like SSL or backups, WordPress staging is not available on all Hostinger tiers. Staging starts exclusively from the Business Web Hosting plan. If you purchase the Single or Premium shared hosting plans, you will not have access to this tool. If you plan on testing themes or plugins frequently, I highly recommend opting for the Business plan right from the start.
SSL & Security in Hostinger (Protecting Your Website)
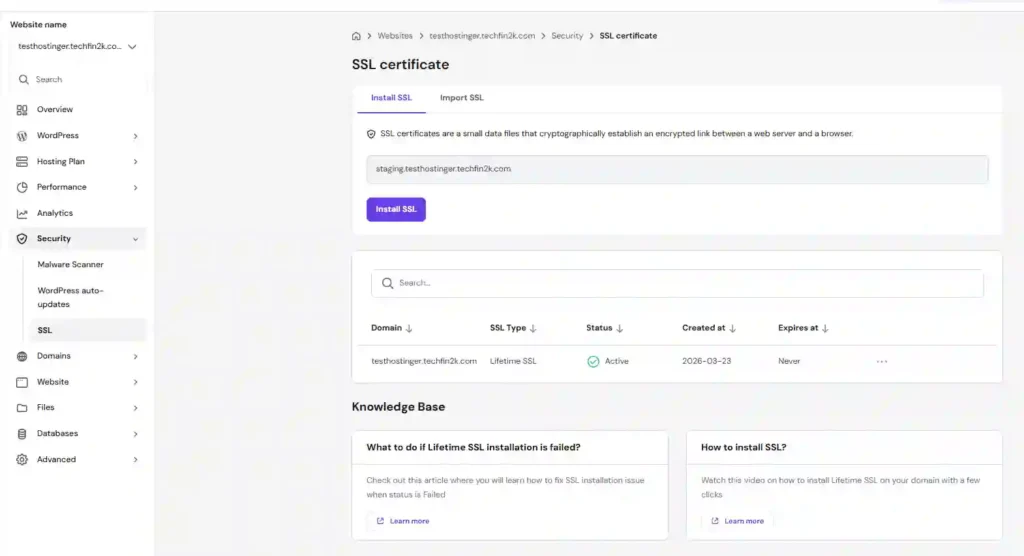
Security is one of the most important aspects of running a website, and Hostinger includes several built-in tools to help protect your site.
From SSL certificates to malware scanning and automatic updates, most essential security features are available directly inside hPanel.
Free SSL Certificate (HTTPS)
Hostinger provides free SSL certificates, which encrypt the connection between your website and visitors.
This enables:
- HTTPS (secure connection)
- Browser “secure” lock icon
- Better trust and SEO rankings
From my experience, SSL is usually installed automatically when you set up your website.
However, you can also manually install or manage SSL from:
hPanel → Security → SSL
Manual SSL & Import Option
Hostinger also allows you to:
- Install SSL manually
- Import external SSL certificates
This is useful if:
- You are using a paid SSL
- You want to use providers like Let’s Encrypt or custom certificates
Built-in Security Features
Apart from SSL, Hostinger includes additional security tools:
- Malware Scanner → Detects potential threats in your website files
- WordPress Auto Updates → Keeps plugins, themes, and core updated
- Secure infrastructure → Protection at server level
These features help reduce risks without requiring extra plugins.
Real Insight (From Usage)
In my case:
- SSL was activated automatically
- No manual setup was required
- The site started loading with HTTPS immediately
This is helpful, especially for beginners who may not be familiar with SSL setup.
Important Note (Cloudflare Users)
If you are using Cloudflare along with Hostinger:
Make sure SSL settings are properly configured:
- Use Full or Full (Strict) SSL mode in Cloudflare
- Avoid “Flexible SSL” (can cause issues)
Otherwise, you may see:
- SSL errors
- redirect loops
Why This Feature Matters
Without proper security:
- Your site can be vulnerable
- Visitors may see “Not Secure” warnings
- SEO rankings can be affected
With Hostinger’s built-in tools:
👉 You get basic security handled automatically, without extra configuration.
AI Assistant (Kodee) in Hostinger (Quick Help Inside hPanel)
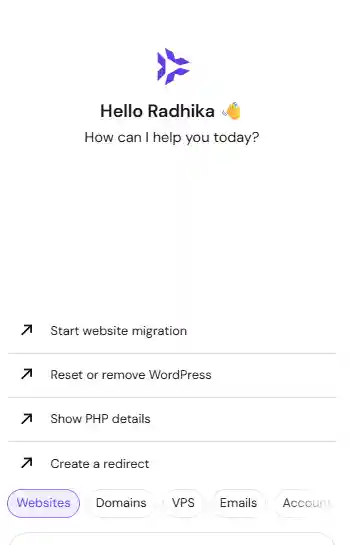
Hostinger also includes an AI assistant (Kodee) inside hPanel, designed to help you quickly perform common tasks without navigating through multiple settings.
What the AI Assistant Can Do
From my experience, the AI assistant provides quick access to tasks across different areas of hosting.
For example, it can help with:
Email Management
- Set up email accounts
- Check inbound/outbound email logs
- Import emails
Domain & Subscription
- Register a new domain
- Start domain transfer
- Check renewal cost
Website Tasks
- Website migration
- Reset or manage WordPress
- Basic troubleshooting
Instead of searching through menus, you can directly access these actions from one place.
Real Experience (From Usage)
When I opened the AI assistant, it showed:
- A simple chat interface
- Ready-to-use quick actions
- Suggestions based on common tasks
This makes it especially useful for beginners who are not familiar with hPanel navigation.
When It’s Actually Useful
The AI assistant is helpful when:
- You don’t know where a setting is
- You want to perform quick tasks
- You need guidance without searching tutorials
It saves time and simplifies common operations.
Limitation (Important to Know)
While helpful, the AI assistant works best for:
✔ Basic and guided tasks
For advanced configurations:
- You may still need to use manual settings
Think of it as a shortcut tool, not a full replacement.
Why This Feature Matters
Instead of navigating through multiple sections:
You can quickly access common tasks from one place
This makes Hostinger more beginner-friendly compared to traditional hosting panels.
Git & SSH Access in Hostinger (For Advanced Users)
For users who want more control over their website, Hostinger also provides Git integration and SSH access.
These features are mainly useful for developers or advanced users who manage websites using code.
Git Integration (Deploy Using Code)
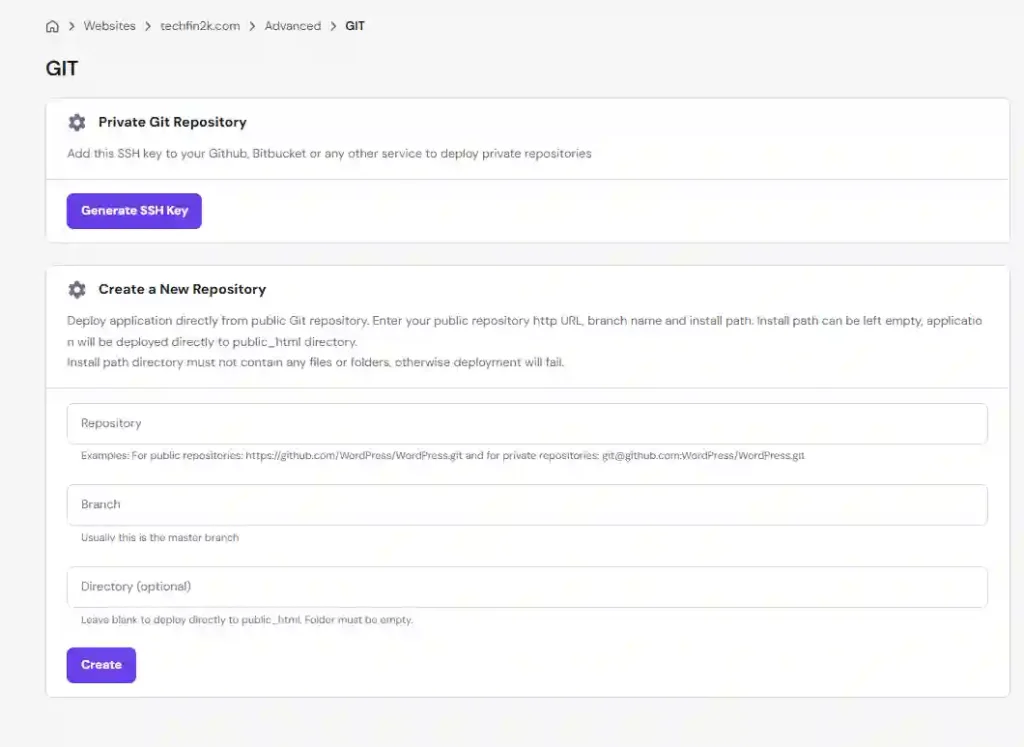
Hostinger allows you to connect your website with a Git repository (like GitHub or Bitbucket).
From what I observed, you can:
- Add SSH keys to connect private repositories
- Deploy websites directly from a Git repository
- Specify branch and installation path
This is useful if you want to manage your website using version control instead of uploading files manually.
SSH Access (Direct Server Access)
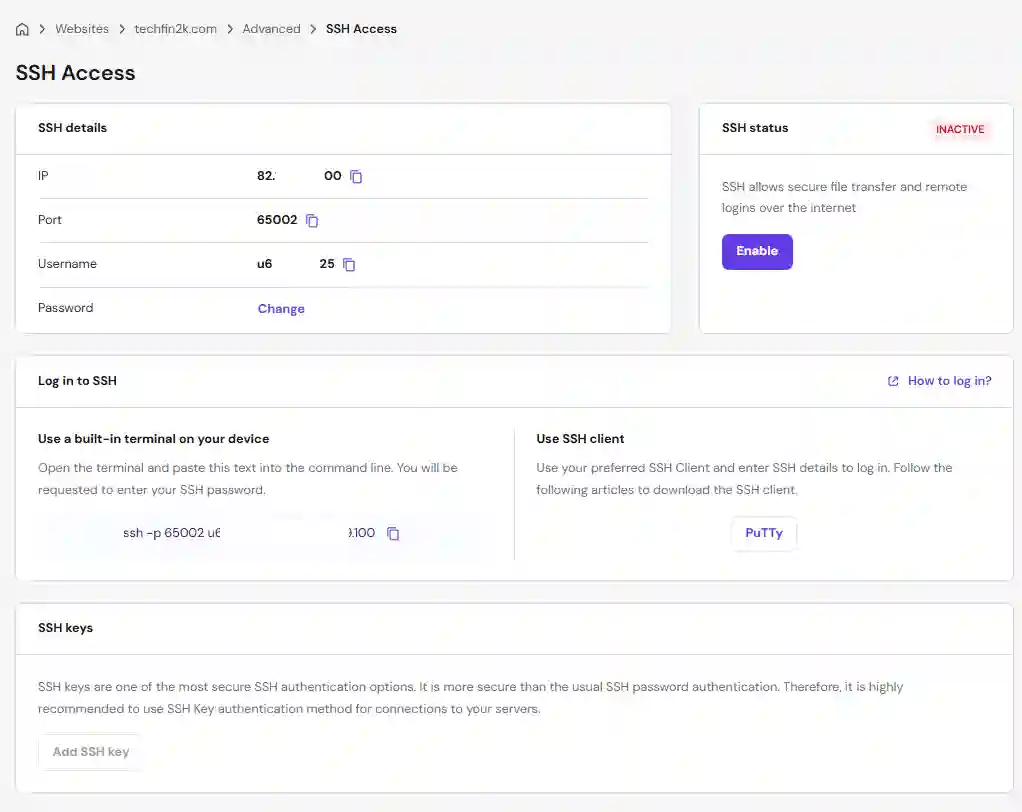
Hostinger also provides SSH access, which allows you to connect to your server using a terminal.
With SSH, you can:
- Access files directly
- Run commands
- Manage your website at a deeper level
For example, you can log in using a command like:
ssh username@server-ip -p port
Real Observation
From my setup:
- SSH access is disabled by default
- You need to enable it manually
- Login details (IP, port, username) are provided in hPanel
This ensures better security by default.
Important Note
These features are:
- Not required for beginners
- Mostly used by developers or advanced users
If you are using WordPress normally, you may never need Git or SSH.
Why This Feature Matters
Even though most users won’t use it daily, having Git and SSH access means:
Hostinger is flexible enough for both beginners and advanced users
Pros and cons of hostinger features
- ✔️ Beginner-friendly control panel (hPanel)
- ✔️ Free SSL and built-in security tools
- ✔️ Automatic backups with long retention (up to 45 days)
- ✔️ Staging environment for safe testing
- ✔️ Affordable pricing compared to competitors
- ✔️ Built-in tools reduce need for extra plugins
- ✖️ Free email only available for the first year
- ✖️ Some advanced features limited to higher plans
- ✖️ External CDN setup (Cloudflare) may be confusing for beginners
- ✖️ Resource limits can affect high-traffic sites
Final Thoughts: Is Hostinger Worth It?
After using Hostinger across different setups—from basic WordPress installs to testing features like staging, backups, and resource monitoring—I can say one thing clearly:
It’s designed to make website management simple without limiting flexibility.
What stood out to me the most:
- Easy-to-use hPanel (no technical complexity)
- Built-in features like CDN, backups, and staging
- Helpful tools like AI assistant and resource monitoring
- Advanced options like Git and SSH for future scaling
Whether you’re a beginner or someone growing a website, Hostinger covers both sides quite well.
Who Should Use Hostinger?
Hostinger is a good choice if you:
- Are starting your first website or blog
- Want a fast and simple hosting setup
- Prefer built-in features instead of installing multiple plugins
- Plan to scale your website over time
Honest Note
No hosting is perfect.
If you are doing highly advanced configurations or enterprise-level projects, you might need more specialized solutions.
But for most users, especially bloggers and affiliate marketers, Hostinger provides more than enough value for the price.
🚀 Ready to Start Your Website?
If you’re planning to launch your website or switch to a faster and beginner-friendly hosting, Hostinger is a solid choice based on my experience.
👉 You get essential features like free SSL, backups, staging, and performance tools — all in one place.
👉 Check Hostinger Plans & Pricing*This is an affiliate link. I may earn a commission at no extra cost to you.
If you’re planning to start your website or switch hosting, you can check Hostinger here:
My Recommendation
If you’re a beginner, start with a basic plan and focus on:
- Setting up your site properly
- Optimizing speed
- Understanding key features
You can always upgrade later as your website grows.
FAQs
1. Does Hostinger provide free email hosting?
Yes, Hostinger provides domain-based email hosting (like contact@foenix.techfin2k.com). On most current plans, it is free for the first year, after which it renews at an additional cost depending on the plan.
2. Is Hostinger CDN better than Cloudflare?
Hostinger’s built-in CDN is easier to use and ideal for beginners since it works directly inside hPanel. Cloudflare, on the other hand, offers more advanced features like firewall protection and better caching control, making it suitable for advanced users.
3. How often does Hostinger create backups?
Hostinger automatically creates backups (daily or weekly depending on the plan). On higher-tier plans like Business hosting, backups can be stored for up to 45 days.
4. What is the Hostinger staging environment?
The staging environment is a duplicate version of your website used to safely test changes before applying them to your live site. It is typically available on higher-tier plans like Business hosting.
5. Does Hostinger provide free SSL certificates?
Yes, Hostinger includes free SSL certificates for all domains and subdomains. These are automatically installed and renewed, ensuring your website runs securely over HTTPS.
6. What happens when you publish staging in Hostinger?
When you publish staging, your test site replaces the live website. You can revert changes if needed, but it’s recommended to take a manual backup before publishing.
7. Why should I monitor resource usage in Hostinger?
Monitoring resource usage helps you track CPU, memory, and server limits. This allows you to optimize your site performance and avoid slowdowns or unexpected issues.
8. Is Hostinger good for beginners?
Yes, Hostinger is beginner-friendly thanks to its custom hPanel dashboard, built-in tools, and guided setup features, making it easy to manage websites without technical knowledge.
9. Does Hostinger include all features in every plan?
No, some features like staging, higher backup retention, and advanced tools are typically available only on higher-tier plans. It’s important to check the plan details before purchasing.
{ “@context”: “https://schema.org”, “@type”: “FAQPage”, “mainEntity”: [ { “@type”: “Question”, “name”: “Does Hostinger provide free email hosting?”, “acceptedAnswer”: { “@type”: “Answer”, “text”: “Yes, Hostinger provides domain-based email hosting like contact@yourdomain.com. On most current plans, it is free for the first year, after which it renews at an additional cost depending on the plan.” } }, { “@type”: “Question”, “name”: “Is Hostinger CDN better than Cloudflare?”, “acceptedAnswer”: { “@type”: “Answer”, “text”: “Hostinger’s built-in CDN is easier to use and ideal for beginners since it works directly inside hPanel. Cloudflare offers more advanced features like firewall protection and better caching control, making it suitable for advanced users.” } }, { “@type”: “Question”, “name”: “How often does Hostinger create backups?”, “acceptedAnswer”: { “@type”: “Answer”, “text”: “Hostinger automatically creates backups either daily or weekly depending on the plan. On higher-tier plans like Business hosting, backups can be stored for up to 45 days.” } }, { “@type”: “Question”, “name”: “What is the Hostinger staging environment?”, “acceptedAnswer”: { “@type”: “Answer”, “text”: “The staging environment is a duplicate version of your website used to safely test changes before applying them to your live site. It is typically available on higher-tier plans like Business hosting.” } }, { “@type”: “Question”, “name”: “Does Hostinger provide free SSL certificates?”, “acceptedAnswer”: { “@type”: “Answer”, “text”: “Yes, Hostinger includes free SSL certificates for all domains and subdomains. These are automatically installed and renewed, ensuring your website runs securely over HTTPS.” } }, { “@type”: “Question”, “name”: “What happens when you publish staging in Hostinger?”, “acceptedAnswer”: { “@type”: “Answer”, “text”: “When you publish staging, your test site replaces the live website. You can revert changes if needed, but it is recommended to take a manual backup before publishing.” } }, { “@type”: “Question”, “name”: “Why should I monitor resource usage in Hostinger?”, “acceptedAnswer”: { “@type”: “Answer”, “text”: “Monitoring resource usage helps you track CPU, memory, and server limits. This allows you to optimize your site performance and avoid slowdowns or unexpected issues.” } }, { “@type”: “Question”, “name”: “Is Hostinger good for beginners?”, “acceptedAnswer”: { “@type”: “Answer”, “text”: “Yes, Hostinger is beginner-friendly thanks to its custom hPanel dashboard, built-in tools, and guided setup features, making it easy to manage websites without technical knowledge.” } }, { “@type”: “Question”, “name”: “Does Hostinger include all features in every plan?”, “acceptedAnswer”: { “@type”: “Answer”, “text”: “No, some features like staging, higher backup retention, and advanced tools are typically available only on higher-tier plans. It is important to check the plan details before purchasing.” } } ] }
One Comment