
Introduction
In this step-by-step guide, I’ll show you exactly how to install Joomla on Hostinger using the latest hPanel interface.
This guide is based on my own hands-on testing. I installed Joomla on a Hostinger hosting account from scratch and documented each step so you can follow the same process with confidence. Along the way, I’ll also share a few practical observations I made during the installation, including the Custom PHP/HTML website setup, domain connection, Joomla Auto Installer, and the final verification after installation.
By the end of this tutorial, you’ll have a fully functional Joomla website ready for customization.
Prefer watching instead? The video above demonstrates the complete Joomla installation process on Hostinger using the latest hPanel interface.
This tutorial is based on my own hands-on testing using a live Hostinger hosting account. Every screenshot in this guide was captured during my Joomla installation on the subdomain joomla.foenix.techfin2k.com, so the steps reflect the actual installation workflow rather than a theoretical walkthrough.
Step 1: Create a Website for Your Joomla Installation
Before you can install Joomla on Hostinger, you first need to create a website. This website acts as the hosting environment where Joomla, its files, and its database will be installed. Once the website is created, Hostinger’s Auto Installer can install Joomla automatically.
Log in to your Hostinger account to access the hPanel dashboard.
From the left-hand navigation menu, click Websites.
The Websites page displays all the websites associated with your hosting account.
Click + Add Website in the upper-right corner to create a new website.
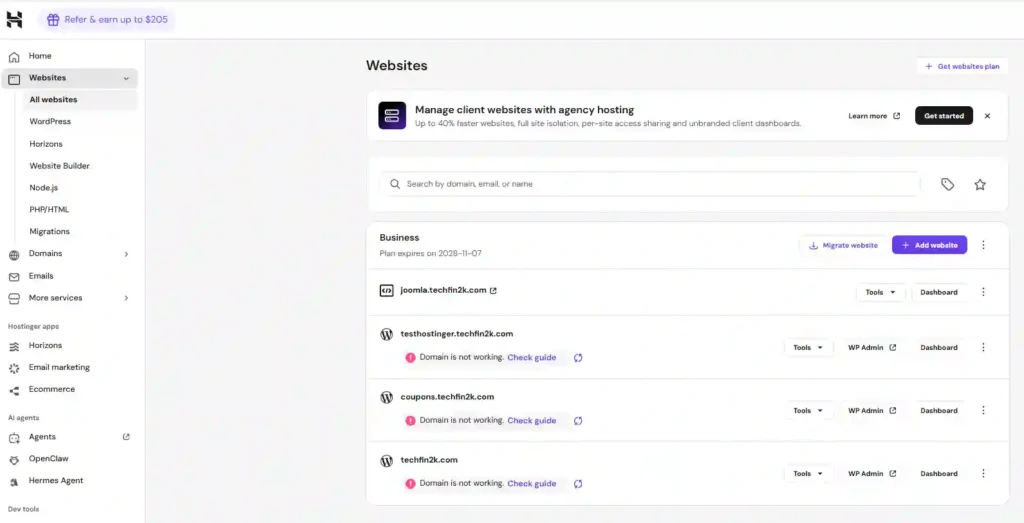
Hostinger offers a dedicated WordPress setup for users who want to install WordPress directly.
Since we’re installing Joomla, select Custom PHP/HTML Website. After the website is created, Hostinger’s Auto Installer lets you install a wide range of applications, including Joomla, Drupal, OpenCart, phpBB, and many others.
Select Custom PHP/HTML Website to continue creating the website.
While this guide focuses specifically on installing Joomla, Hostinger includes many other useful features beyond the Auto Installer. If you’re new to Hostinger or want to explore everything it offers, check out my detailed guide on Hostinger Features Explained, where I cover backups, staging, security, performance tools, email, and other features I tested during my hands-on review.
Step 2: Choose the Domain or Subdomain for Joomla
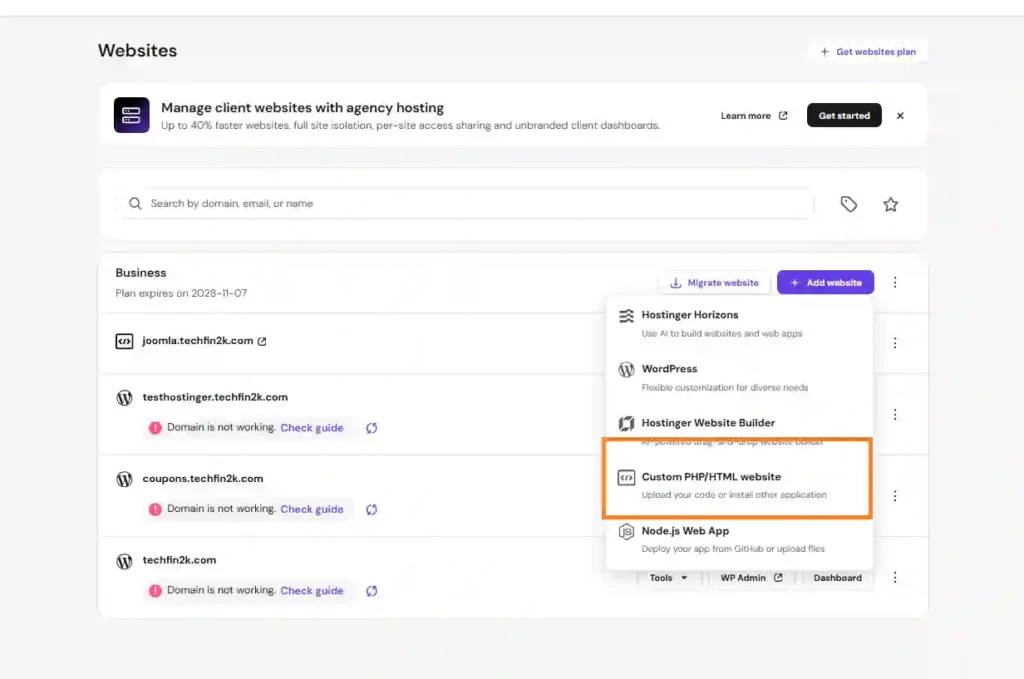
After selecting Custom PHP/HTML Website, Hostinger asks where you want to install Joomla.
Enter the domain or subdomain that you want to use for your Joomla website.
For this tutorial, I installed Joomla on the subdomain joomla.foenix.techfin2k.com.
After entering the domain or subdomain, select it from the suggested list and click Next.
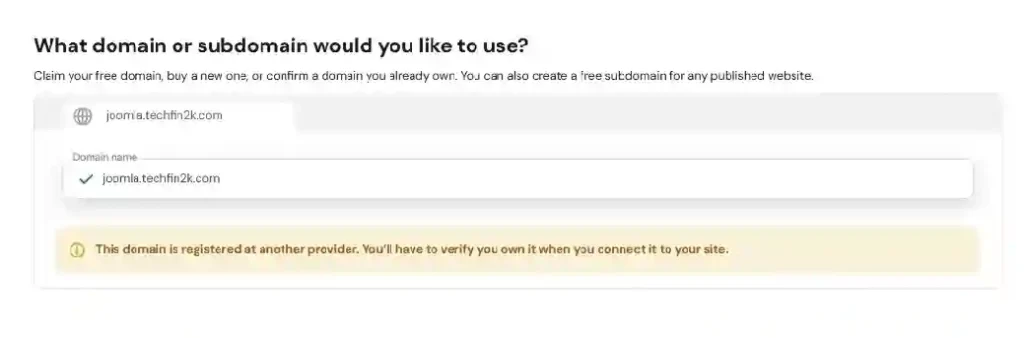
If Hostinger displays a message stating:
“This domain is registered at another provider. You’ll have to verify you own it when you connect it to your site.”
don’t worry—this is an informational message, not an error.
During my testing, this message appeared because my domain’s DNS is managed through Cloudflare. If your domain and DNS are already managed by Hostinger, you may not see this message, and that’s completely normal.
Click Next to continue. In the following step, Hostinger will guide you through connecting the domain if required.
Step 3: Connect the Domain (If Required)
After you click Next, Hostinger begins initializing the website. This usually takes only a few moments while it prepares the hosting environment.
If your domain and DNS are already managed by Hostinger, this step is typically completed automatically, and you can continue directly to your website dashboard.
However, if your domain’s DNS is managed by another provider, Hostinger will display the Point your domain to Hostinger screen and ask you to connect the domain before you can access the website dashboard and continue with the setup.
Hostinger provides two methods for connecting your domain: Nameservers and DNS Records. During my testing, I selected DNS Records because my domain’s DNS was already managed through Cloudflare.
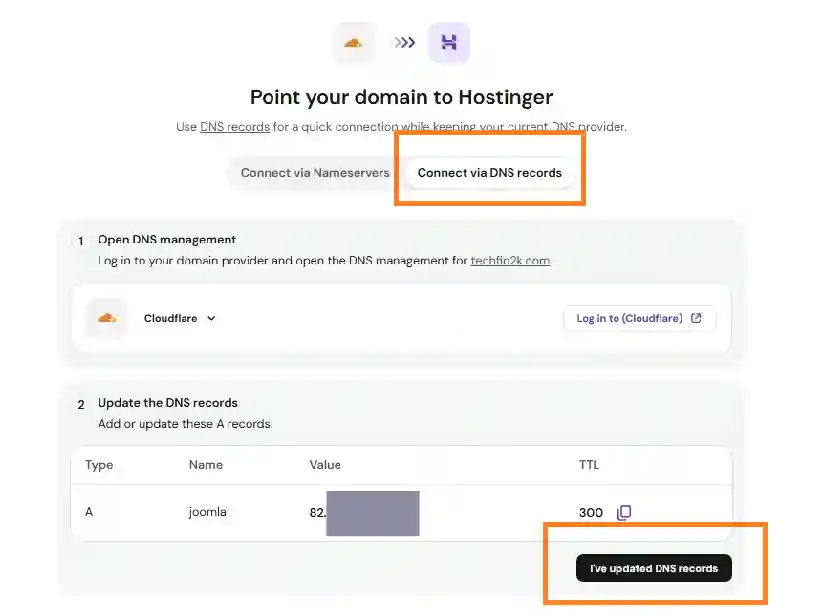
Since the required DNS records had already been configured, I clicked I’ve Updated DNS Records.
Hostinger then verified the DNS configuration and displayed a confirmation message indicating that the domain was successfully connected.
Once the domain is connected, click Close to open the website dashboard and continue with the Joomla installation.
Step 4: Open the Auto Installer
After the domain is connected, Hostinger opens the dashboard for your newly created website. This dashboard contains the tools you’ll use to manage the website, including file management, databases, security settings, performance tools, and the Auto Installer.
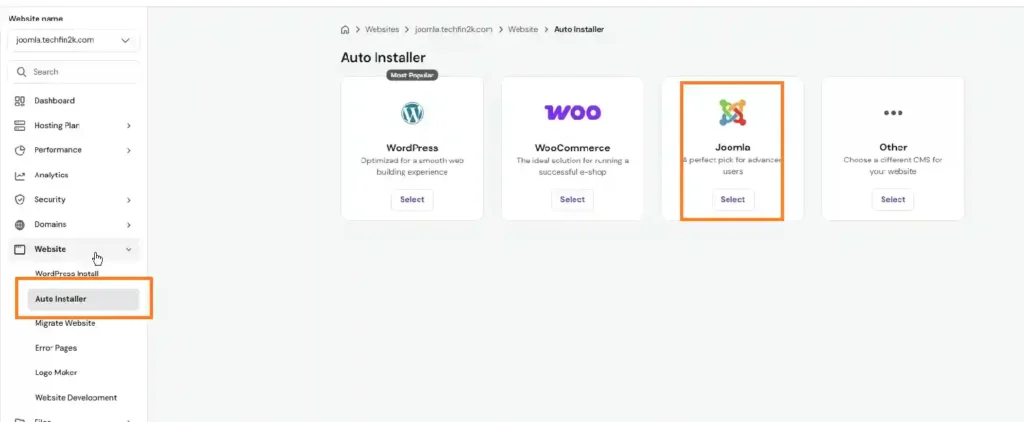
To continue, open the Website section from the left-hand menu and click Auto Installer.
The Auto Installer provides a quick way to install popular web applications without manually uploading files or creating databases. It supports applications such as Joomla, WordPress, Drupal, OpenCart, phpBB, and many others.
Step 5: Install Joomla Using Hostinger’s Auto Installer
After opening the Auto Installer, you’ll see a list of supported applications.
Locate Joomla and click Select to begin the installation.
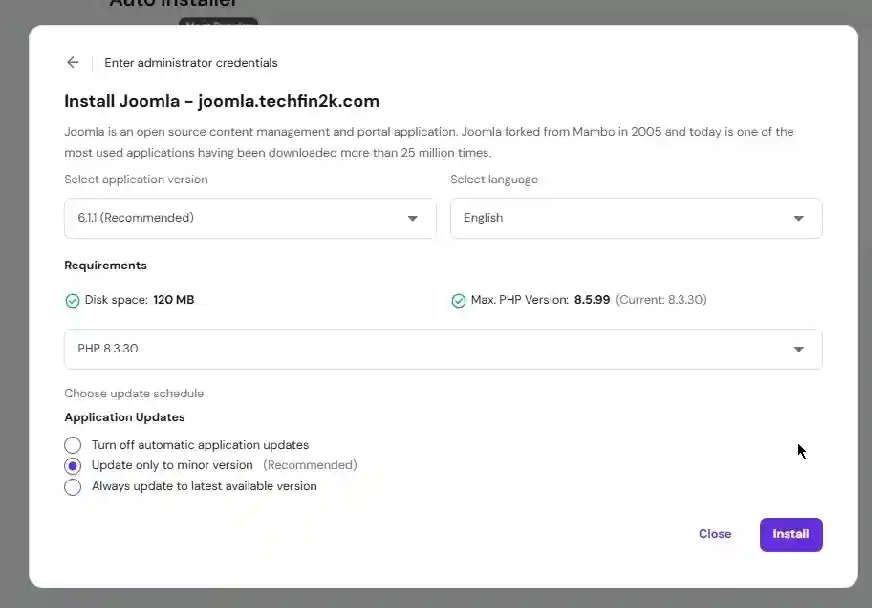
Hostinger will then display the Joomla installation form, where you’ll configure your website and administrator account.
Enter the required information, including:
- Website Title – The name of your Joomla website.
- Administrator Email – The email address used for the administrator account.
- Administrator Username – Your Joomla login username.
- Administrator Password – Create a strong password to secure your administrator account.
Next, review the installation settings.
During my testing, Hostinger automatically selected the latest recommended Joomla version, displayed the current PHP version, and allowed me to choose the application update schedule. During my testing, I selected Update only to the minor version, which is Hostinger’s recommended update option.
Once you’ve reviewed the settings, click Install.
Hostinger will automatically install Joomla, create the required files and database configuration, and prepare your website for use.
Step 6: Verify the Joomla Installation
Once the installation is complete, Hostinger displays a confirmation message indicating that Joomla has been installed successfully.
Open your website’s domain or subdomain to verify that the Joomla website loads correctly. Then, access the Joomla Administrator login page and sign in using the Administrator Username and Administrator Password you created during the installation process.
If the login is successful, you’ll be taken to the Joomla Administrator dashboard, where you can begin managing your Joomla website.
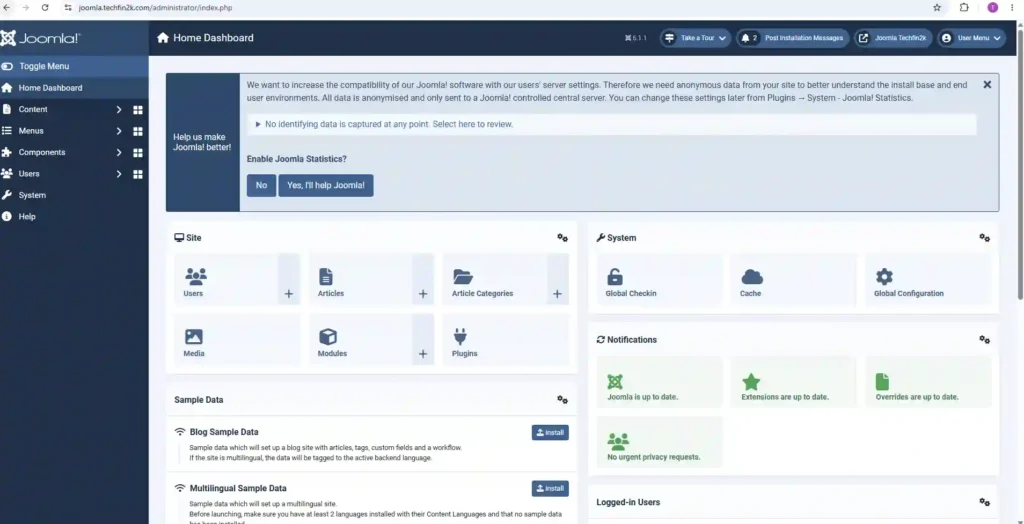
Successfully accessing the Joomla Administrator dashboard confirms that Joomla has been installed correctly and that your website is ready for administration.
From here, you can start creating articles, uploading media, installing extensions, managing users, and customizing your Joomla website. I’ll cover these topics in separate beginner-friendly Joomla tutorials.
Final Thoughts
Installing Joomla on Hostinger turned out to be a straightforward process during my testing. Hostinger’s Auto Installer handled the technical setup automatically, allowing me to install Joomla without manually creating a database or uploading installation files.
The only additional step I encountered was connecting the domain because my DNS is managed through Cloudflare. If your domain and DNS are already managed by Hostinger, your installation process will likely be even simpler.
Overall, I found the installation process beginner-friendly, and within a few minutes, I was able to access the Joomla Administrator dashboard and confirm that everything was working correctly.
If you’re considering Hostinger or want to explore more of its built-in tools, I also recommend reading my Hostinger Features Explained guide, where I share my hands-on experience with many of the features available in hPanel beyond Joomla installation.
Get Started with Hostinger
If you’re planning to create a Joomla website on Hostinger, I found the Auto Installer to be one of the quickest ways to get started during my testing.
If you don’t have a Hostinger hosting plan yet, you can use my affiliate link below to get started. It helps support TechFin2K at no additional cost to you.
Frequently Asked Questions (FAQs)
Can I install Joomla on Hostinger without creating a database manually?
Yes. Hostinger’s Auto Installer automatically creates and configures the required database during the Joomla installation process. You only need to enter your website and administrator details before clicking Install.
Can I install Joomla on a subdomain instead of a primary domain?
Yes. During my testing, I installed Joomla on a subdomain (joomla.foenix.techfin2k.com), and the installation process was the same as installing it on a primary domain.
Why did Hostinger ask me to connect my domain?
If your domain’s DNS is managed by another provider, such as Cloudflare, Hostinger may ask you to connect the domain before you can access the website dashboard. If your domain and DNS are already managed by Hostinger, this step is usually completed automatically.
How do I access the Joomla Administrator dashboard after installation?
After Joomla is installed, sign in using the Administrator Username and Administrator Password you created during the installation process. Once logged in, you’ll be able to manage your Joomla website through the Administrator dashboard.
