
Last Updated on June 30, 2026 by RADHIKA VATLAM
Introduction
If you manage a WordPress website, backups are one of those things you do not think about until the day something breaks.
A plugin update can go wrong. A theme change can affect the layout. A post can get deleted by mistake. Even a successful restore can look confusing if cache is still serving an old version of the page.
That is why Hostinger’s backup system is worth understanding properly.
In this guide, I will walk you through how Hostinger backup and restore work, when to use automatic backups versus manual backups, how to restore a website, and what to check if the content does not appear immediately after a restore.
This is based on a real test using a WordPress site hosted on Hostinger, where I deliberately removed a plugin and content, then restored the website using hPanel.
What Hostinger Backups Actually Do
Hostinger Backup and Restore is a built-in recovery system that helps website owners return their websites to a previous working state when something goes wrong.
In simple terms, backups act as a safety net for your website. Instead of spending hours trying to fix a broken site, you can restore a previous version and get back online much faster.
This can be especially useful if:
- a plugin update breaks your website layout
- a theme change causes display issues
- important content is accidentally deleted
- configuration changes create unexpected errors
- testing new features causes problems
For WordPress users, having reliable backups can make the difference between a quick recovery and a lengthy troubleshooting process.
Backup Retention Period (Real-World Observation)
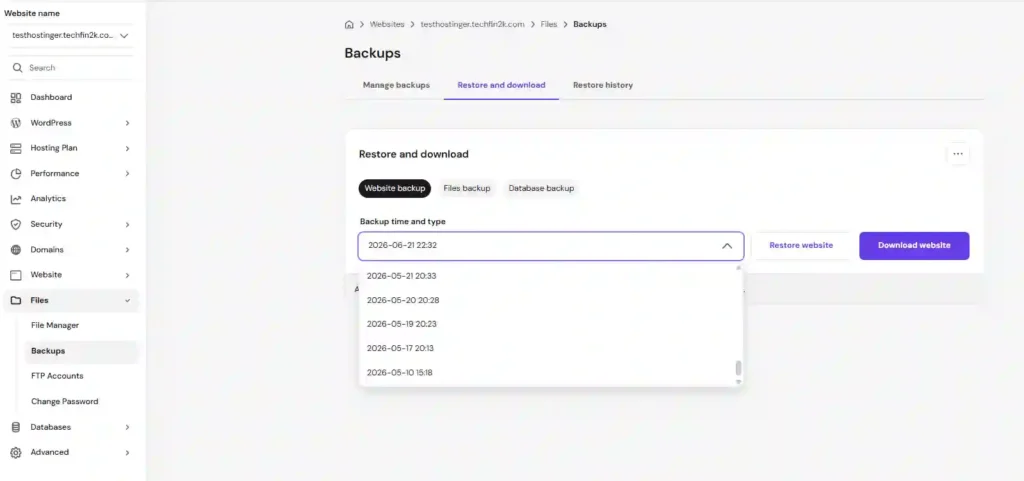
One thing that stood out during my testing was the backup retention period available on my Hostinger Business hosting plan.
Many hosting providers keep backups for only 7 to 14 days, but in my case, Hostinger provided access to restore points going back as far as 45 days.
The exact backup retention period depends on your Hostinger hosting plan and may change over time. During my testing on the Business plan, I had access to restore points going back approximately 45 days.
This longer retention period gives website owners a much larger recovery window. If you discover a problem several days or even weeks later, there is a better chance that a usable backup is still available.
Of course, backup retention may vary depending on your hosting plan and Hostinger’s current policies, but having access to multiple historical restore points is a valuable safety feature.
Website Backup, File Backup, and Database Backup
Hostinger gives you more than one type of backup, and it is useful to know the difference.
Website Backup is the most complete option. It restores both the website files and the database, so it is the best choice when you want the entire site brought back together.
File Backup is for the website files only. That includes things like themes, plugins, and uploaded media.
Database Backup is for the database only. That is where posts, pages, comments, and many site settings are stored.
For most WordPress recovery situations, Website Backup is the option I would choose first, because it is the simplest way to restore everything at once.
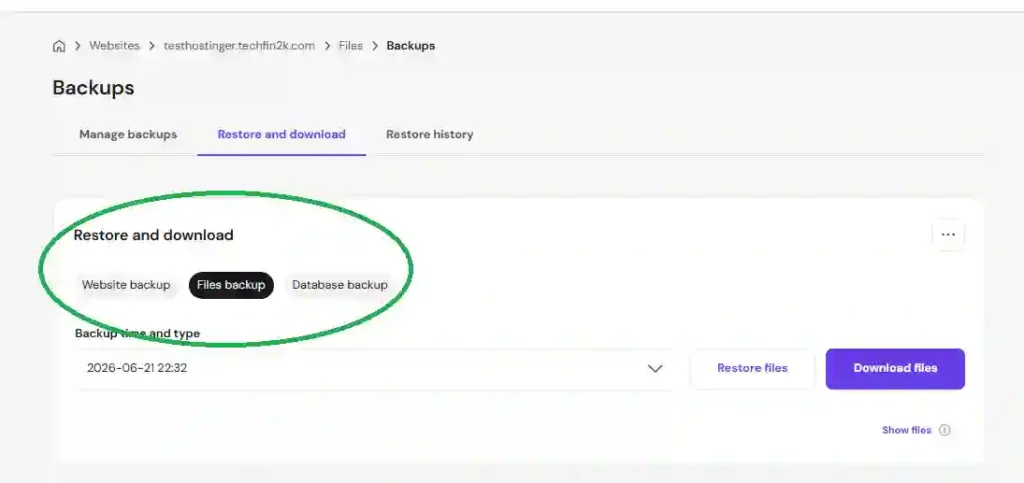
During my testing, I used the Website Backup option because it restores both website files and the database together. That made it the best choice for recovering deleted content, plugins, and site settings in a single restoration process.
For most WordPress recovery situations, Website Backup is the simplest option because it brings everything back together at once.
Automatic Backups vs Manual Backups
Hostinger gives you both automatic and manual backup options, and they serve slightly different purposes.
1) Automatic Backups
Automatic backups are the default safety net. Hostinger creates them without you needing to remember anything.
That is useful because most people only think about backups after a problem starts. Automatic backups remove that risk.
2) Manual Backups
Manual backups are the one I recommend before doing anything important.
Create a manual backup before:
- updating WordPress
- updating plugins or themes
- editing key configuration files
- testing a new design
- making major content or layout changes
Creating a manual backup is not always necessary because Hostinger already generates automatic backups.
However, I still recommend creating a manual backup before making significant changes to your website. Having a fresh restore point immediately before a plugin update, theme change, redesign, or migration provides additional peace of mind and can make recovery much easier if something unexpected happens.
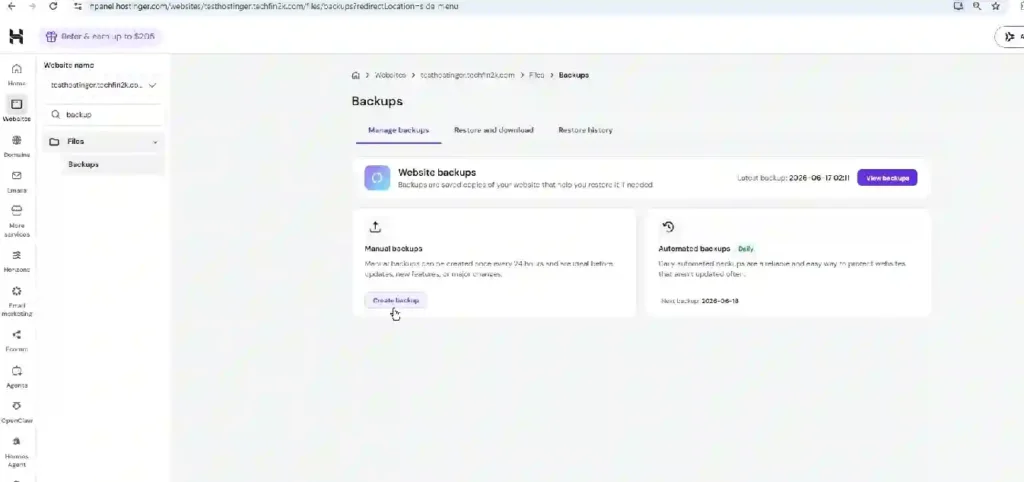
As shown above, Hostinger allows manual backups can be created once every 24 hours. While daily automated backups already provide a safety net, creating a manual backup before major updates or website changes gives you a fresh restore point that can be useful if something goes wrong immediately after the change.
Step-by-Step: How to Create a Backup in Hostinger
Follow these steps to create a manual backup in Hostinger hPanel:
- Log in to your Hostinger hPanel account.
- Open the Websites section and select the website you want to back up.
- Click Dashboard next to the website.
- In the left sidebar, open the Files section.
- Click Backups.
- Select Manage Backups.
- Open the Manual Backups tab.
- Click Create Backup.
Hostinger displays a message stating:
“Manual backups can be created once every 24 hours and are ideal before updates, new features, or major changes.”
After clicking Create Backup, Hostinger shows another confirmation message explaining that a backup of both website files and databases will be created. Depending on the size of the website, the process may take anywhere from a few minutes to up to one hour.
Once the backup is completed, the new restore point becomes available in the backup history.
Testing Hostinger Backup and Restore
To verify that Hostinger’s backup system works as expected, I performed a practical restoration test on a WordPress website hosted on Hostinger.
For this test, I used a separate WordPress installation on the subdomain testhostinger.foenix.techfin2k.com, allowing me to safely test the backup and restore process without affecting my main website.
After creating a manual backup, I intentionally made several changes to the website. These included deleting a published post, removing the WPForms Lite plugin, and deleting the Astra theme after activating a different theme.
The goal was to simulate the type of accidental changes that website owners may occasionally encounter while managing their websites.
To recover the website, I restored it using the manual backup I had created earlier. However, the same restoration process can also be performed using one of Hostinger’s available automatic backups, depending on which restore point best matches your requirements.
The following sections show the exact restoration process and the results after the backup was restored.
How to Restore a Website Backup in Hostinger
Once the test changes were completed, I restored the website using the manual backup I had created earlier. I deliberately chose the manual backup instead of one of the automatic backups because I wanted to restore the website to the exact state it was in immediately before I started testing. If you don’t have a manual backup available, you can restore your website using one of Hostinger’s automatic backup restore points instead.
The restoration process was straightforward:
- Log in to Hostinger hPanel.
- Select the website you want to restore.
- Navigate to Files → Backups.
- Open the Restore and Download tab.
- Select Website Backup.
- Choose the backup date you want to restore.
- Click Restore Website.
- Confirm the restoration request.
- Wait for Hostinger to complete the restoration process.
For this test, I selected the manual backup created before making any changes to the website. However, the same process can also be used with Hostinger’s automatic backups if you prefer to restore from an earlier restore point.
I used the Website Backup option because it restores both website files and the database together. This makes it the most convenient option when recovering deleted posts, plugins, themes, and website settings in a single operation.
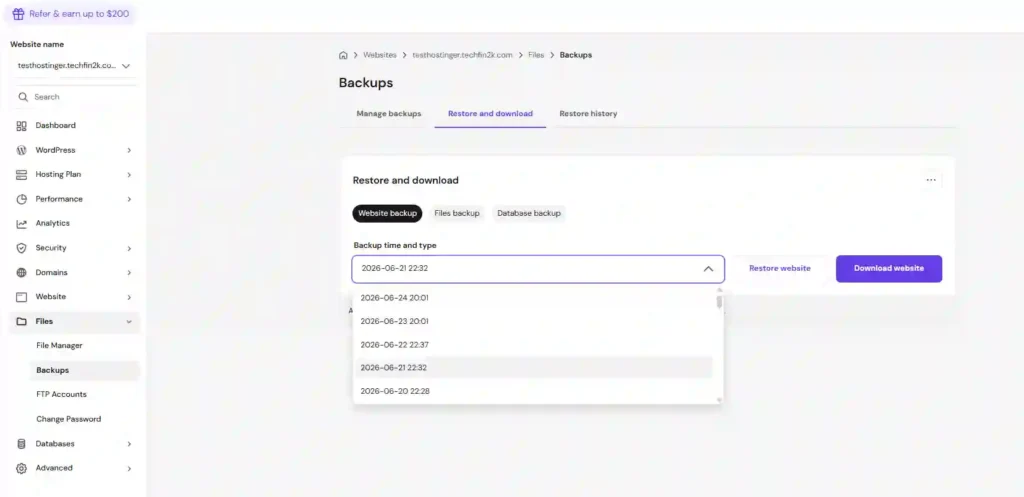
Watch the Complete Backup and Restore Process
The screenshots in this guide highlight the main steps, but the video below shows the complete process in real time.
In this demonstration, I create a manual backup, delete website content, remove the WPForms Lite plugin, delete the Astra theme, and then restore everything using Hostinger’s backup system. I also cover an important LiteSpeed Cache issue that made the restored content appear missing until the cache was cleared.
Watch the video below to see the full backup and restoration process from start to finish.
Important: The Cache Can Make a Successful Restore Look Broken
One issue I encountered during testing was that the website did not appear to be fully restored immediately after the restoration process completed.
The restoration itself completed successfully, and the deleted plugin and theme were restored correctly. However, the deleted HostArmada Review post was still missing from the homepage.
The issue was not with the backup restoration. Instead, LiteSpeed Cache was still serving an older cached version of the homepage.
To resolve the issue, I:
- Logged in to the WordPress Dashboard.
- Navigated to LiteSpeed Cache → Toolbox.
- Clicked Purge All.
- Refreshed the homepage.
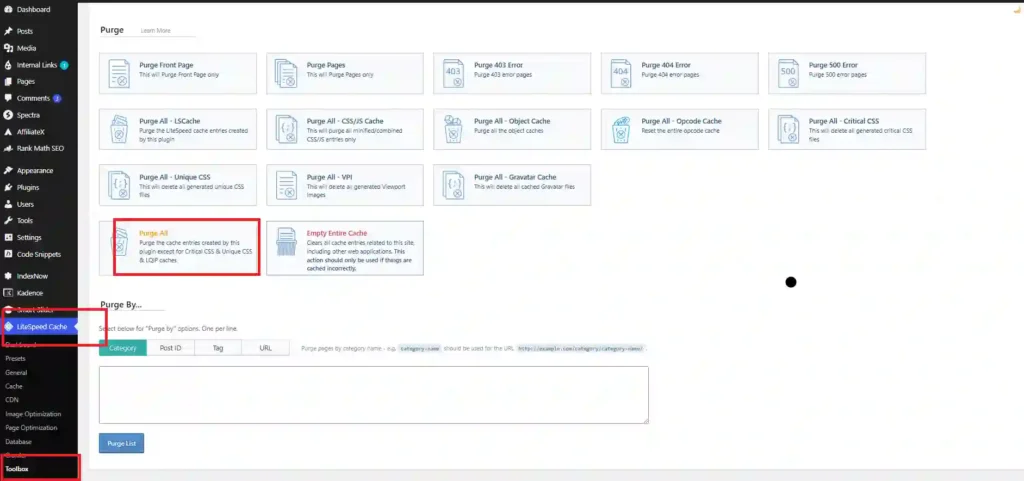
After clearing the LiteSpeed Cache, the restored blog post appeared on the homepage as expected.
If your website uses Cloudflare, a similar situation can occur. Even after a successful restoration, Cloudflare may continue serving a cached version of your website. In that case, purge the Cloudflare cache (see my Cloudflare setup guide) and refresh the page before assuming that the restoration has failed.
This is an easy step to overlook, but if your website does not immediately reflect the restored content, checking both your WordPress cache and Cloudflare cache should be one of your first troubleshooting steps.
Flexible Restore Options
One of the advantages of Hostinger’s backup system is that you are not limited to restoring the entire website.
Depending on the issue, you can restore:
- Website Backup – restores both website files and the database.
- Files Backup – restores only your website files, such as themes, plugins, and uploads.
- Database Backup – restores your website database, including posts, pages, comments, and many WordPress settings.
Choosing the appropriate backup type can make the recovery process more efficient while avoiding unnecessary changes to other parts of your website.
Best Practice: Keep an Additional Backup Copy
Hostinger’s built-in backup system provides an excellent safety net, but I still recommend keeping an additional copy of important backups whenever possible.
For critical websites, it is a good practice to:
- Download important backups periodically.
- Store a copy on your computer.
- Keep another copy in a cloud storage service.
Having an independent backup provides an extra layer of protection if you ever need to restore your website outside of your hosting account.
Final Thoughts
After testing Hostinger Backup and Restore on a live WordPress installation, I found the restoration process to be straightforward and reliable.
The manual backup was created successfully, the deleted post, WPForms Lite plugin, and Astra theme were restored without any issues, and the overall recovery process worked as expected.
The only issue I encountered was that the restored blog post did not immediately appear on the homepage because LiteSpeed Cache was serving a cached version of the page. Clearing the cache resolved the issue instantly.
Overall, Hostinger’s backup system is easy to use and provides enough flexibility to recover from common WordPress problems. Whether you choose a manual backup or one of the available automatic backups, understanding how the backup and restoration process works before you actually need it can save significant time and reduce unnecessary stress.
📘 New to Hostinger?
This tutorial focused on Hostinger Backup & Restore, but hPanel offers many more powerful features. I’ve tested and explained them in a detailed hands-on guide covering staging, website management, performance tools, security, email, and much more.
Frequently Asked Questions
Does Hostinger provide automatic backups?
Yes. Hostinger provides automatic backups based on your hosting plan. During my testing on the Hostinger Business plan, automatic backups were available alongside the option to create manual backups whenever needed (subject to the plan’s backup policy).
Can I create a manual backup before updating WordPress?
Yes. In fact, creating a manual backup before updating WordPress, installing new plugins, changing themes, or making major website changes is considered a best practice. It provides a recent restore point that you can quickly roll back to if something goes wrong.
What should I do if my website still looks unchanged after restoring a backup?
If your website appears unchanged after a successful restoration, check your cache before assuming the restore failed. During my testing, LiteSpeed Cache served an older cached version of the homepage until I cleared the cache. If you use Cloudflare, you may also need to purge the Cloudflare cache.
Does a Website Backup restore plugins, themes, and posts?
Yes. Hostinger’s Website Backup restores both your website files and database. In my testing, it successfully restored a deleted WordPress post, the WPForms Lite plugin, and the Astra theme using a single website restore.
